Friday, January 03, 2020

Thursday, January 02, 2020

What an Italian Doctor of Death Sees | OZY


What an Italian Doctor of Death Sees

This feature contains graphic content written by a forensics professional about the reality of the ongoing migrant crisis, and may be upsetting to some people.

The gates to the morgues are all made of iron. And no matter if they started out black, gray or blue, they are all faded. They mark a border place, where every day death breaks into little parts. Exorcising the fear and crushing it, in small doses, while measuring the lost.

We first look for the last sign of vitality of a body that is now like a piece of marble. An autopsy is a ritual and, like any ritual, requires that precise instructions are followed. Precise cuts. 

It involves cutting the skin with a linear cut. Linear like the sea cut by the horizon line. The sea. Every day in this part of the world bodies of migrants end up in the sea around Italy.

They rest silently on the seabed, and sometimes, when the remains are found, they become bodies for autopsy. Most of them are Black. Young. Many times they are women. Many more times they are children. And finally, mothers with their children. I think, or try not to think, of what their smiles may have looked like. Their energy, now faded and gone to other places. Like I said: Everything here is still, settled, static.

They need me to find a cause of death. To find the origin. To justify. And me? Well, I am here by chance, because this is a job that gives you time.

The first thing I always see, or notice, when I get to work, though? The light through that iron door. It's always a blinding light. White and cold.

Not too long after getting there, I'm sunk in the smell of rubble, of stagnation, decomposition. It's a smell that has a sparkling, acidic tone that remains in my nose for days. Around me, the bringers of the bodies, the carriers of carrion, like hyenas, are waiting for answers. Everyone here, all participants in this ritual, seems excited. Possibly because they feel the enormous distance and detachment that exists between the living breath and the lungs that no longer breathe.

They need me to find a cause of death. To find the origin. To justify. And me? Well, I am here by chance, because this is a job that gives you time: time to think, time to make music, time to not work with death. See, in the end, the ritual lasts only a couple of hours, and then I am free to go.

So, I have time.

The drowned man today is a giant bear. All his tissues have absorbed water, so in death he's like a sponge. A sponge soaked in stagnation. The skin is macerated; it's white. Whirlwinds of worms dance in the orifices, fighting. The abdomen is swollen with putrefactive gases.

Fish bites complete the picture of a profound social reality for migrating migrants, while they move from air to water, from life to death.

The first cut I make, though, is the one that runs from the chin to the pubis. It gives me my first view inside the carcass, and now I'm facing the inner world.

Then the bone that makes the chest a prison must be detached. It's a cage meant to protect the heart and the lungs, our central engine, the motor. So I use shears. They separate the ribs one by one.

When I get to the diaphragm, you can see that it marks the boundary between the engine and the muffler. With a few accessories: the liver, pancreas, spleen and a pair of kidneys. Everything below is in a state of colliquation, and the viscera are a single pasty cluster of shreds. Which is what we need for some samples for toxicological tests.

The smell is getting stronger now. The tone is darker; you feel the blood, macerated blood. Now it's time for the cockpit. They call it bimastoid cutting — passing through the vertex, but the skin of the head is removed and turned into a cauliflower. Then the saw.

The pale rays of that cold light make the minute corpuscles of the bones shine. I think back to the cleaning of the blackboard at school where, if you were a lucky child, you got to clap the erasers and all the chalk became volatile.

Which is what's happening now, but it's not chalkboard chalk. It's bone dust. And it's snowing bone dust as the room starts to fill with it before the seat of our imaginings: the brain.

The brain looks like a huge mushroom, and in the cases of drowning victims it sometimes is too broken down to be of much use anymore. Now all the inner parts are present on the table, brain included, and once analyzed I pour them back into the abdomen of the victim.

At one point all of this stuff had very precise roles and fit inside some sort of a social order. Now? They are all the same. All piled up in the belly cavity. And soon, in the belly of the Earth. Piece by piece, limbs on limbs, memory after memory. 

Life is a memory itself. A distant memory, now that everything comes together again. The broken pieces try to unite and dictate the ancient shapes of a skin. The human puzzle. The life puzzle.

A large needle, like those used by upholsterers to sew mattresses, waits patiently on the tool trolley. The black thread stitches the gaps dictated by the cuts. The circle closes, the ritual is broken and the mess is now over. Go in peace.

After work: Clean, dressed and depressed, Famularo heads out for coffee.

Mostly, though, death just reminds me that every problem, every fear, every desire lives only in our heads. We have heads full of problems that do not exist in "the long term."

So finally we are just what we have done, as it's a very quick step between life and death, between the miraculous and the sanctified, between a butterfly and a worm.

Some people say that the future can be foreseen in the furrows of the hand. I know better. I know from those furrows that the future does not exist because those furrows don't have any kind of tomorrow. Our dreams of the future are all just projections, and there is a today, a moment and the hope that the circumstances remain favorable as long as we're alive to perceive them.

The bodies leave, the light is turned off, the iron door closes. I then usually have a cup of coffee, and a breath of fresh air. This day I hear the song of a blackbird. I move away from the morgue and the border between here and tomorrow, from the furrow of the trench, and I say a thank you for being there again. For being here again.


Getting Fit With Fake Horse Riding … for $100 a Class | OZY

clip clop to yer hearts content….

Getting Fit With Fake Horse Riding … for $100 a Class

Straddling Simon is no easy task, and once aboard this 6-foot stallion, I'm bounced around like a puppet. And just when I'm getting into the rhythm, he speeds up … and I fall forward, my fists wrapped in his mane. 

Simon is a horse-riding simulator, an adult-size electronic rocking horse that provides all the punch of a horse with the temperament of an iPhone. His movements mimic that of a real horse, and the experience can be enjoyable — that's the point. But once you're acclimatized to riding a fake horse — thighs burning, endorphins rising — you'll soon learn how to trot up and down like a natural.

But first things first: "He's not a stationary bike. Simon's a tool, not a horse," says trainer Colleen J. Reid of California-based Colleen Reid Dressage, pressing the small of my back to correct my form. Although even she admits riding him feels "like a velociraptor on hind legs."   

Horse-riding simulators were invented in 1982, initially designed as an aid for rehabilitating jockeys. But in recent years fitness fans have found them a fun way to liven up their workouts — a less stressful alternative to SoulCycle and Barry's Bootcamp.

They provide a full-body workout and benefit anyone who wants to strengthen and tone their body.

English company Racewood is the leader of the fake-horse herd, shipping simulators to Japan, Oman, Canada and South Africa — they were even at the Rio Olympics. Their latest models use pressure sensors to measure riders' weight and balance distribution and transmit rider data to a screen for real-time riding feedback. Racewood originally focused on the pro domain, but in recent years the company has also been providing fake horses to the fitness industry, at about $60,000 a pop.

The fake horses "provide a full-body workout and benefit anyone who wants to strengthen and tone their body," says London-based horse trainer Carol Andrews. In 2016, she launched Equicise, an electronic-riding group fitness class in Wimbledon Village Stables in the United Kingdom. Classes include horse posture training, horse yoga and postnatal riding sessions — all set to top-40 tunes. The novelty helps overcome riders' exhaustion, she adds, and people with disabilities or who are horse-shy feel safe here. "And you don't have to worry about the English weather!"

Most states in the U.S. have horse simulators too — mainly for horse-riding training, but fitness is a growing dual purpose. At the Tryon International Equestrian Center in North Carolina, instructor Barbro Ask-Upmark offers 30-minute rides on simulators Dante and Tryon Maximus for $100. People fly in to train here, she says, and her clientele is 80 percent amateur women. Each simulator is named; previous friends include Luke and Lulu. For marketing manager Christy Smith, riding electronic horses is an exhilarating experience."I'm a beginner, and I'm afraid of heights," she says. 

So they're a comforting intro to an unfamiliar world — but clearly in a middle-class one, like snowboarding, pentathlon or sailing (there's a reason that members of the British monarchy enjoy these pursuits).

Electronic horses are getting popular for another reason: There's a global horse shortage. In 2012, the Center for Economic Research and Forecasting reported there's been a 35 percent drop in the number of horses since 2003. Electronic horses help bridge that gap — although they don't offer a better workout than a real horse — and are easier to navigate than the real thing. For example, a 2015 study in the Journal of Equine and Veterinary Science reported heart rates were higher in real-life riding but suggested increasing the simulator tempo to bridge the difference.

In terms of pure joy, it's hard to beat the feeling of wind in your face and a breathing, galloping horse beneath you. But horses are hard to come by in a city, and for people looking for the fitness benefit — or for training, minus a horse's temperament — simulators are pretty awesome pieces of kit. 


11 Most Effective Home Remedies For Receding Gums

11 Most Effective Home Remedies For Receding Gums

11 Most Effective Home Remedies For Receding Gums

11 Most Effective Home Remedies For Receding Gums

Receding gums, or gingival recession, is a retraction of the gums from the crown of the teeth.

It is a progressive condition that may start as early as in childhood or adolescence and worsens ever so gradually over the years.

By the time it becomes apparent, usually past the age of 40, the roots of the teeth may have become exposed.

The roots of teeth sit in their individual sockets in the jaw bone. But the gum tissue tightly covering the jaw bones and the base of their crowns plays a role in fixing the teeth in position and keeping them stable.

The gums should ideally hug each tooth at a point a little above its neck––where the crown of the tooth meets the root. This protects the lower portion of the tooth from exposure to food materials and pathogens.

The First Stage Of Gum Recession

Separation of the gum margins from the tooth is the first stage of recession.

Our Favorite DIY Projects

Let's see how that happens.

Bacteria in the mouth invariably form plaque, a sticky film on the teeth. You can remove bacteria by brushing and flossing, but unless removed periodically, preferably once every 12 hours, it can harden into tartar, a hard, yellowish-white calcareous deposit.

Plaque and tartar buildup at the margins of gums cause their separation from the teeth. This, in turn, facilitates, even more, tartar deposits in the space between the teeth and the gums.

Gum recession is usually associated with poor dental hygiene since gum disease is the most common cause of this condition. But even if you brush your teeth religiously every morning and night and thoroughly floss in between them, you could still have receding gums.

In fact, overaggressive hygiene measures like vigorous brushing and flossing can be equally responsible for gum inflammation, which exacerbates the gingival recession.

Some of the other risk factors for receding gums include smoking and tobacco use, bleeding from the gums as in scurvy due to Vitamin C deficiency, acid damage to the teeth enamel from acid reflux or self-induced vomiting, and orthodontic treatment involving repositioning of teeth.

Gum recession is often ignored because it doesn't cause any problems early on.

More often than not, it gets attention only when it starts to affect the aesthetics or cause other problems like sensitivity to hot or cold or acidic foods, abscesses in the gum, and tooth mobility.

If left unattended, it can even lead to premature loss of teeth.

If you have any of the following symptoms of gum recession, it pays to take remedial measures as early as possible:

Longer teeth – This is hard to notice since the changes are gradual, but you could compare the present length with old photos.

Color change at the gum line – You might notice that your tooth crown and exposed root may be in different shades.

Inflamed gums –  Your gums are red and swollen, especially along the margins.

Bleeding from the gums – Your gums may bleed when brushing teeth or biting into apples or other hard foods.

Food sensitivity – You may have a sharp pain when consuming hot, cold, sweet or acidic food and drinks.

Shaking teeth – You may feel your teeth moving slightly.

In early stages of gum recession, scaling, removal of plaque and tartar, combined with thorough, yet gentle, dental hygiene measures help control the condition.

However, advanced cases often require surgical procedures such as gingival grafting. But here are some effective home remedies you can try irrespective of how severe the condition may be.

11 Home Remedies For Receding Gums

1. Yarrow

Yarrow is commonly called nosebleed or soldier's woundwort because the juice of its leaves and stem can stop bleeding.

Many North American tribes chew the leaves as a remedy for a toothache as well as a number of other ailments.

The anticoagulant, anti-inflammatory, and analgesic, effects of yarrow can help with receding gums at any stage.

The simplest way to use yarrow is to chew on the leaves and stems if you have access to fresh supply.

Pound the leaves or grind them into a paste and use it for gum massage. You can also make a yarrow tea for gargling. Pour boiling water over a handful of fresh or dried yarrow flowers and leaves or 1-2 Tbsp dry herb and let it steep for 15-20 minutes. Strain and use when the tea has cooled down.

This antiseptic tea can improve oral hygiene in general and remedy a number of problems, including gum disease and throat infections.

If you don't want to mess with the herb, you can use the essential oil of yarrow. This blue-colored oil is very potent, so mix in a few drops of coconut oil or another carrier oil before using it as a gum paint.

2. Sumac

Whether you know sumac as a bush or tree growing in your backyard or as a tangy, red spice used for flavoring dishes or making pink lemonade, it can help you with receding gums.

The plant parts have tannins that leave a puckering taste and a dry, sandpapery feel in the mouth characteristic of astringency.

They draw out fluids from tissues, reducing inflammation and restoring gum tightness.

Remove the outer skin from sumac twigs and use them for massaging the gums or crush their tips and use them to brush the teeth and gums. You can boil the leaves to make a tea for gargling, or the red berries can be made into refreshing Indian lemonade.

In addition, sumac berries are rich in Vitamin. You can also use the dried and coarsely powdered berries as a spice.

In case you are collecting leaves or berries from the wild, poison sumac has white berries, so you can easily tell it apart from the red-berried sumac Rhus spp.

3. Green tea

Regular use of green tea is found to improve dental health. It's not surprising since the antioxidant and anti-inflammatory properties of green are well known.

According to a Japanese study, green tea habit not only reduces the chance of developing periodontal disease but brings down gum inflammation and improves the attachment of gums to the teeth.

Sip green tea once or twice a day, allowing the tannins in the beverage to do the work.

4. Sage

Sage tea is another herbal remedy you can try for receding gums.

This herb has a long history of being used for dental problems, thanks to its excellent antimicrobial and anti-inflammatory properties.

People used to chew its leaves as a remedy for swollen gums and dental abscesses.

A tea made from sage leaves can be used as a gargle for a sore throat and mouth ulcers. It can improve overall dental hygiene, besides protecting your gums.

Making a sage tea from fresh or dried sage is easy.

Just steep a handful of fresh leaves or 2 Tbsp dried herb in hot water for 15-20 minutes and strain out the liquid. You can even use the leftover slush for massaging the gums.

5. Aloe vera

The soothing gel obtained from the succulent leaves of Aloe vera can reduce gum inflammation and recession.

Use fresh herb for this purpose. Break off a piece of the leaf and rub it on your gums. Repeat this as often as you like.

The gel can be scooped out and stored in the refrigerator. After brushing your teeth, dab the gel on your gums and massage to restore the tight texture of the gum tissue.

6. Sesame seed oil

Oil pulling is an ancient Ayurvedic technique of detoxification.

Put 1-2 Tbsp of sesame seed oil in your mouth and swish it around for 10-15 minutes before spitting it out. Although oil pulling is used to treat several health problems, improvement in dental health is one of the earliest outcomes.

However, it does take a bit of getting used to.

Be sure not to oil pull on an empty stomach.

7. Coconut oil

The lauric acid and medium chain triglycerides (MCTs) in coconut oil have antimicrobial and anti-inflammatory properties.

Massaging the gums with a pinch of fine sea salt mixed with a bit of virgin coconut oil can reduce inflammation.

Although oil pulling is traditionally performed with sesame seed oil, you can try coconut oil as well. It is lighter and has a more pleasant taste. Melt 1-2 Tbsp oil in a ladle and use.

8. Lemon oil

The essential oil of lemon obtained from the lemon peel is antiseptic and antimicrobial.

Add ten drops of lemon oil to a cup of warm water and gargle, or mix 2-3 drops in a teaspoonful of coconut oil and rub on your gums to reduce inflammation and recession.

This bitter oil has a fresh citrusy smell that can dispel bad breath.

9. Clove oil

Clove oil is widely used for toothache relief because it numbs the soft tissues, but it's only a temporary effect.

The oil is often used in dental hygiene products for its strong, long-lasting, antibacterial effect.

It also tops the list for its antioxidant capacity. Use 5-6 drops in a cup of warm water as a mouthwash.

10. Lemongrass oil

Lemongrass has anti-fungal and antiseptic properties that prevent the growth of certain kinds of yeast and bacteria commonly found in the mouth.

It has an anti-inflammatory, astringent action on the gums too. Boil 2-3 stems in water to make a pleasantly lemony mouth gargle or use ten drops of the essential oil in a cup of warm water.

Regular use relieves inflammation and restores the normal, healthy texture of gums.

11. Vitamin C

A deficiency in Vitamin C can cause gum inflammation and bleeding. Supplementation usually shows dramatic improvement.

Vitamins are ideally obtained from food because they are better utilized by the body in their natural forms rather than their synthetic versions.

Fresh vegetables and fruits are rich in Vitamin C, especially dark leafy greens, bell peppers, broccoli, tomatoes kiwifruit, berries and citrus fruits.

However, a significant percentage of the vitamin C is lost during storage, juicing and cooking.

To avoid this, source fresh fruit and vegetables locally whenever possible, and consume them raw.

Drink green smoothies and fruit juices immediately after preparation.

If you are not getting enough of Vitamin C from foods, consider taking a good supplement.


Stay healthy!
~A.

Wednesday, January 01, 2020

Breaking Down Toxic PFAS | Earthjustice

Breaking Down Toxic PFAS | Earthjustice

Breaking Down Toxic PFAS

Drinking water is one of the most common routes of exposure to PFAS.
Drinking water is one of the most common routes of exposure to PFAS. PFAS have polluted the tap water of at least 16 million people in 33 states and Puerto Rico, as well as groundwater in at least 38 states.

Jun. 28, 2019

Toxic chemicals known as PFAS are found in everyday products like waterproof jackets and nonstick pans. They're linked to cancer, and they've contaminated drinking water sources across the country.

The U.S. Environmental Protection Agency recently released its delayed Nationwide Per- and Polyfluoroalkyl Substances Action Plan. It falls far short of what is needed to protect communities.

"This is an action plan with no action," said Suzanne Novak, an Earthjustice attorney who is representing families in southeastern Pennsylvania who were exposed to high levels of PFAS in their drinking water. "It is a long list of initiating steps that EPA should have been doing for the past few years, but no concrete actions."

Make your voice heard! Urge your representatives to require that companies report their use of all PFAS chemicals.

Here's a breakdown of what PFAS are, why they're harmful, and what we can do to protect ourselves from them.

1. What are PFAS?

"PFAS" is short for per- and polyfluoroalkyl substances. Chemicals in this class of more than 5,000 substances are found in products like nonstick pans (e.g. "Teflon"), waterproof jackets, and carpets to repel water, grease, and stains. They're also used in firefighting foam on military bases and in commercial airports. Even personal care products like waterproof mascaras and eyeliners, sunscreen, shampoo, and shaving cream can contain PFAS.

PFAS don't easily break down, and they can persist in your body and in the environment for decades. As a result of their pervasiveness, more than 95 percent of the U.S. population has PFAS in their bodies, according to the Centers for Disease Control and Prevention (CDC).

According to one senior CDC official, the presence and concentration of PFAS in U.S. drinking water presents "one of the most seminal public health challenges for the next decades."

Common items with PFAS.
Map of PFAS Contamination In the United States.

Environmental Working Group and Northeastern University

According to data analyzed by the Environmental Working Group and Northeastern University, as of March 2019, at least 610 locations in 43 states are known to be affected by PFAS contamination, including drinking water systems serving an estimated 19 million people. See interactive map.

2. What do we know about the harms associated with PFAS?

Chemical manufacturers like DuPont and 3M have covered up evidence of the negative human and environmental impacts of PFAS since the 1960s.

Individuals across the country are fighting for accountability, sharing their stories through social media and meeting with their elected officials to demand action.

But mounting research links PFAS to a wide range of health problems.

Studies of the best-known PFAS, called PFOA and PFOS, show links to kidney cancer and testicular cancer, as well as endocrine disruption in humans. Scientists have also discovered unusual clusters of serious medical effects in communities with heavily PFAS-contaminated water. Many such communities are near military bases.

First-generation PFAS are so toxic that U.S. manufacturers phased them out entirely by 2015 (though they still contaminate water supplies today).

Yet against the advice of more than 200 international scientists, chemical companies have replaced several older PFAS with other chemicals in the PFAS family. New PFAS such as GenX act a lot like old PFAS and may be as dangerous.

3. How am I exposed to PFAS?

Drinking water is one of the most common routes of exposure. PFAS have so far polluted the tap water of at least 16 million people in 33 states and Puerto Rico, as well as groundwater in at least 38 states. Tap water contamination is likely more extensive than documented, in part because studies often exclude private wells.

PFAS contaminate water supplies through two main sources: firefighting foam and industrial discharges. For decades, the U.S. military has used firefighting foam in training exercises at hundreds of bases around the country. Federal law long required these bases, as well as commercial airports, to use foam that contains PFAS. A Department of Defense report released in March listed 126 military facilities where water supplies were contaminated with PFAS levels above the EPA's current standard.

The industrial release of PFAS is another major source of water contamination. In 2016, researchers discovered troubling levels of GenX in North Carolina's Cape Fear River. The source was a PFAS manufacturing plant owned by The Chemours Company, a spin-off of DuPont.

Finally, PFAS can accumulate in the human body through food and food packaging. A study in 2017 found PFAS in one-third of all fast food wrappers, where it can easily migrate into greasy foods.

The Intercept, an investigative nonprofit news organization, told the stories of families in Warminster, Penn., and nearby Willow Grove, who suffered from cancers and other health issues due to contamination on the two military bases near their homes.

4. PFAS are everywhere. How do I avoid them?

Avoid items that tout "nonstick" or "waterproof" properties, as they can contain PFAS; reduce or eliminate fast food and carry-out items; and check beauty product labels for the term "fluoro," which indicates a fluorinated chemical.

Consumers can also contact brands to tell them to stop using PFAS in their products. Companies including IKEA, H&M, and Crate & Barrel are already eliminating highly fluorinated chemicals like PFAS from their product lines. However, we need stricter government regulation of PFAS in order to be truly protected.

5. What are regulators doing about PFAS?

For far too long, communities have been left in the dark when PFAs have contaminated their environment. Several states are taking the lead on protecting people from PFAS. Washington state, for example, has bans set to take effect on PFAS from firefighting foams and food packaging, while New York has restricted state agencies from purchasing food containers that include PFAS. (Learn more about state-based efforts.)

On the federal side, legislators have introduced several bills to address the PFAS issue. In August, for example, senators proposed a bipartisan PFAS bill to hold federal agencies accountable for cleaning up contamination at military bases across the country. And in October, Congress directed the Federal Aviation Administration to allow airports to use firefighting foams free of PFAS.

All of these efforts are good first steps, but regulators and legislators must do more to adequately protect communities from PFAS. The EPA has known for decades about the dangers of these chemicals. Yet the agency only recently jumped into action on this issue, largely due to pressure from lawmakers in states like Michigan, New York and North Carolina, where PFAS water contamination is widespread. In addition, there are no PFAS listed on the Toxics Release Inventory, the primary tool for alerting communities to toxic exposures.

On Feb. 14, 2019, the EPA unveiled its delayed Nationwide Per- and Polyfluoroalkyl Substances Action Plan. However, the plan is too little, too late, and falls short of what is needed to protect communities from a class of chemicals that are polluting drinking water and air, while exposing families, particularly children, to a myriad of health risks, including cancer.

The EPA's Action Plan does not include a commitment to set a drinking water standard even for PFOA and PFOS, two of the original PFAS that even manufacturers agree are dangerous. The plan states that so-called "short-term actions" are expected to be completed within two years — even though people are being poisoned now.

6. What's Earthjustice doing?

Earthjustice attorneys are trying to obtain medical monitoring for communities near military bases in southeastern Pennsylvania that were exposed to high levels of PFAS. For decades, the U.S. Navy used PFAS-laced firefighting foam that contaminated water sources in these communities. Though several contaminated wells have been shut down, many residents are terrified that contaminated water contributed to significant community health issues, including brain and breast cancer. In October 2018, Third Circuit judges ruled in favor of the residents, allowing their claim to move forward.

Earthjustice is also pushing for medical monitoring for residents of Hoosick Falls, New York, who were exposed to PFAS contamination after companies discharged PFOA into nearby groundwater and the municipal drinking water supply.

In addition to working directly with impacted communities, our legal, policy, and communications teams are also leveraging our expertise in teaming up with the Center for Environmental Health (CEH), Safer States, and the Safer Chemicals, Healthy Families coalition on state and federal legislation to address PFAS contamination.

We filed comments in Sept. 2018 on behalf of children, women, health, environmental and conservation organizations, in response to the EPA's request for information on specific near-term actions that the agency should take to address challenges presented widespread PFAS contamination.

Some of our recommendations include requiring comprehensive testing for PFAS in all public water systems (and notifying the public of the results), and designating PFAS as "toxic pollutants" under the Clean Water Act. Companies must inform regulators when PFAS are released into the environment. 

During consideration of key recent funding legislation, the U.S. House had an opportunity to add PFAS to the Toxics Release Inventory — a list of over 650 unsafe chemicals monitored by the EPA and disclosed to the public. Unfortunately, lawmakers failed to include tougher protections. Write to your representative and continue to urge them to add all PFAS to this list:


~A.

How To Build A 300 Square Foot Windproof Hoop House For Under $500

How To Build A 300 Square Foot Windproof Hoop House For Under $500

How To Build A 300 Square Foot Windproof Hoop House For Under $500

How To Build A 300 Square Foot Windproof Greenhouse For Under $500

Choosing to build your own greenhouse is an easy decision to make, and it's not as hard as you may think. As with any project, just break this one down into steps and you won't get overwhelmed. While the build itself can be done in two days with a helper.  I chose to go it alone and enjoy the process over two weeks…with an unplanned four week break thanks to heavy rains, and then heavy frost, and then more heavy rains – in case you thought this would go perfectly, mother nature has her own ideas.

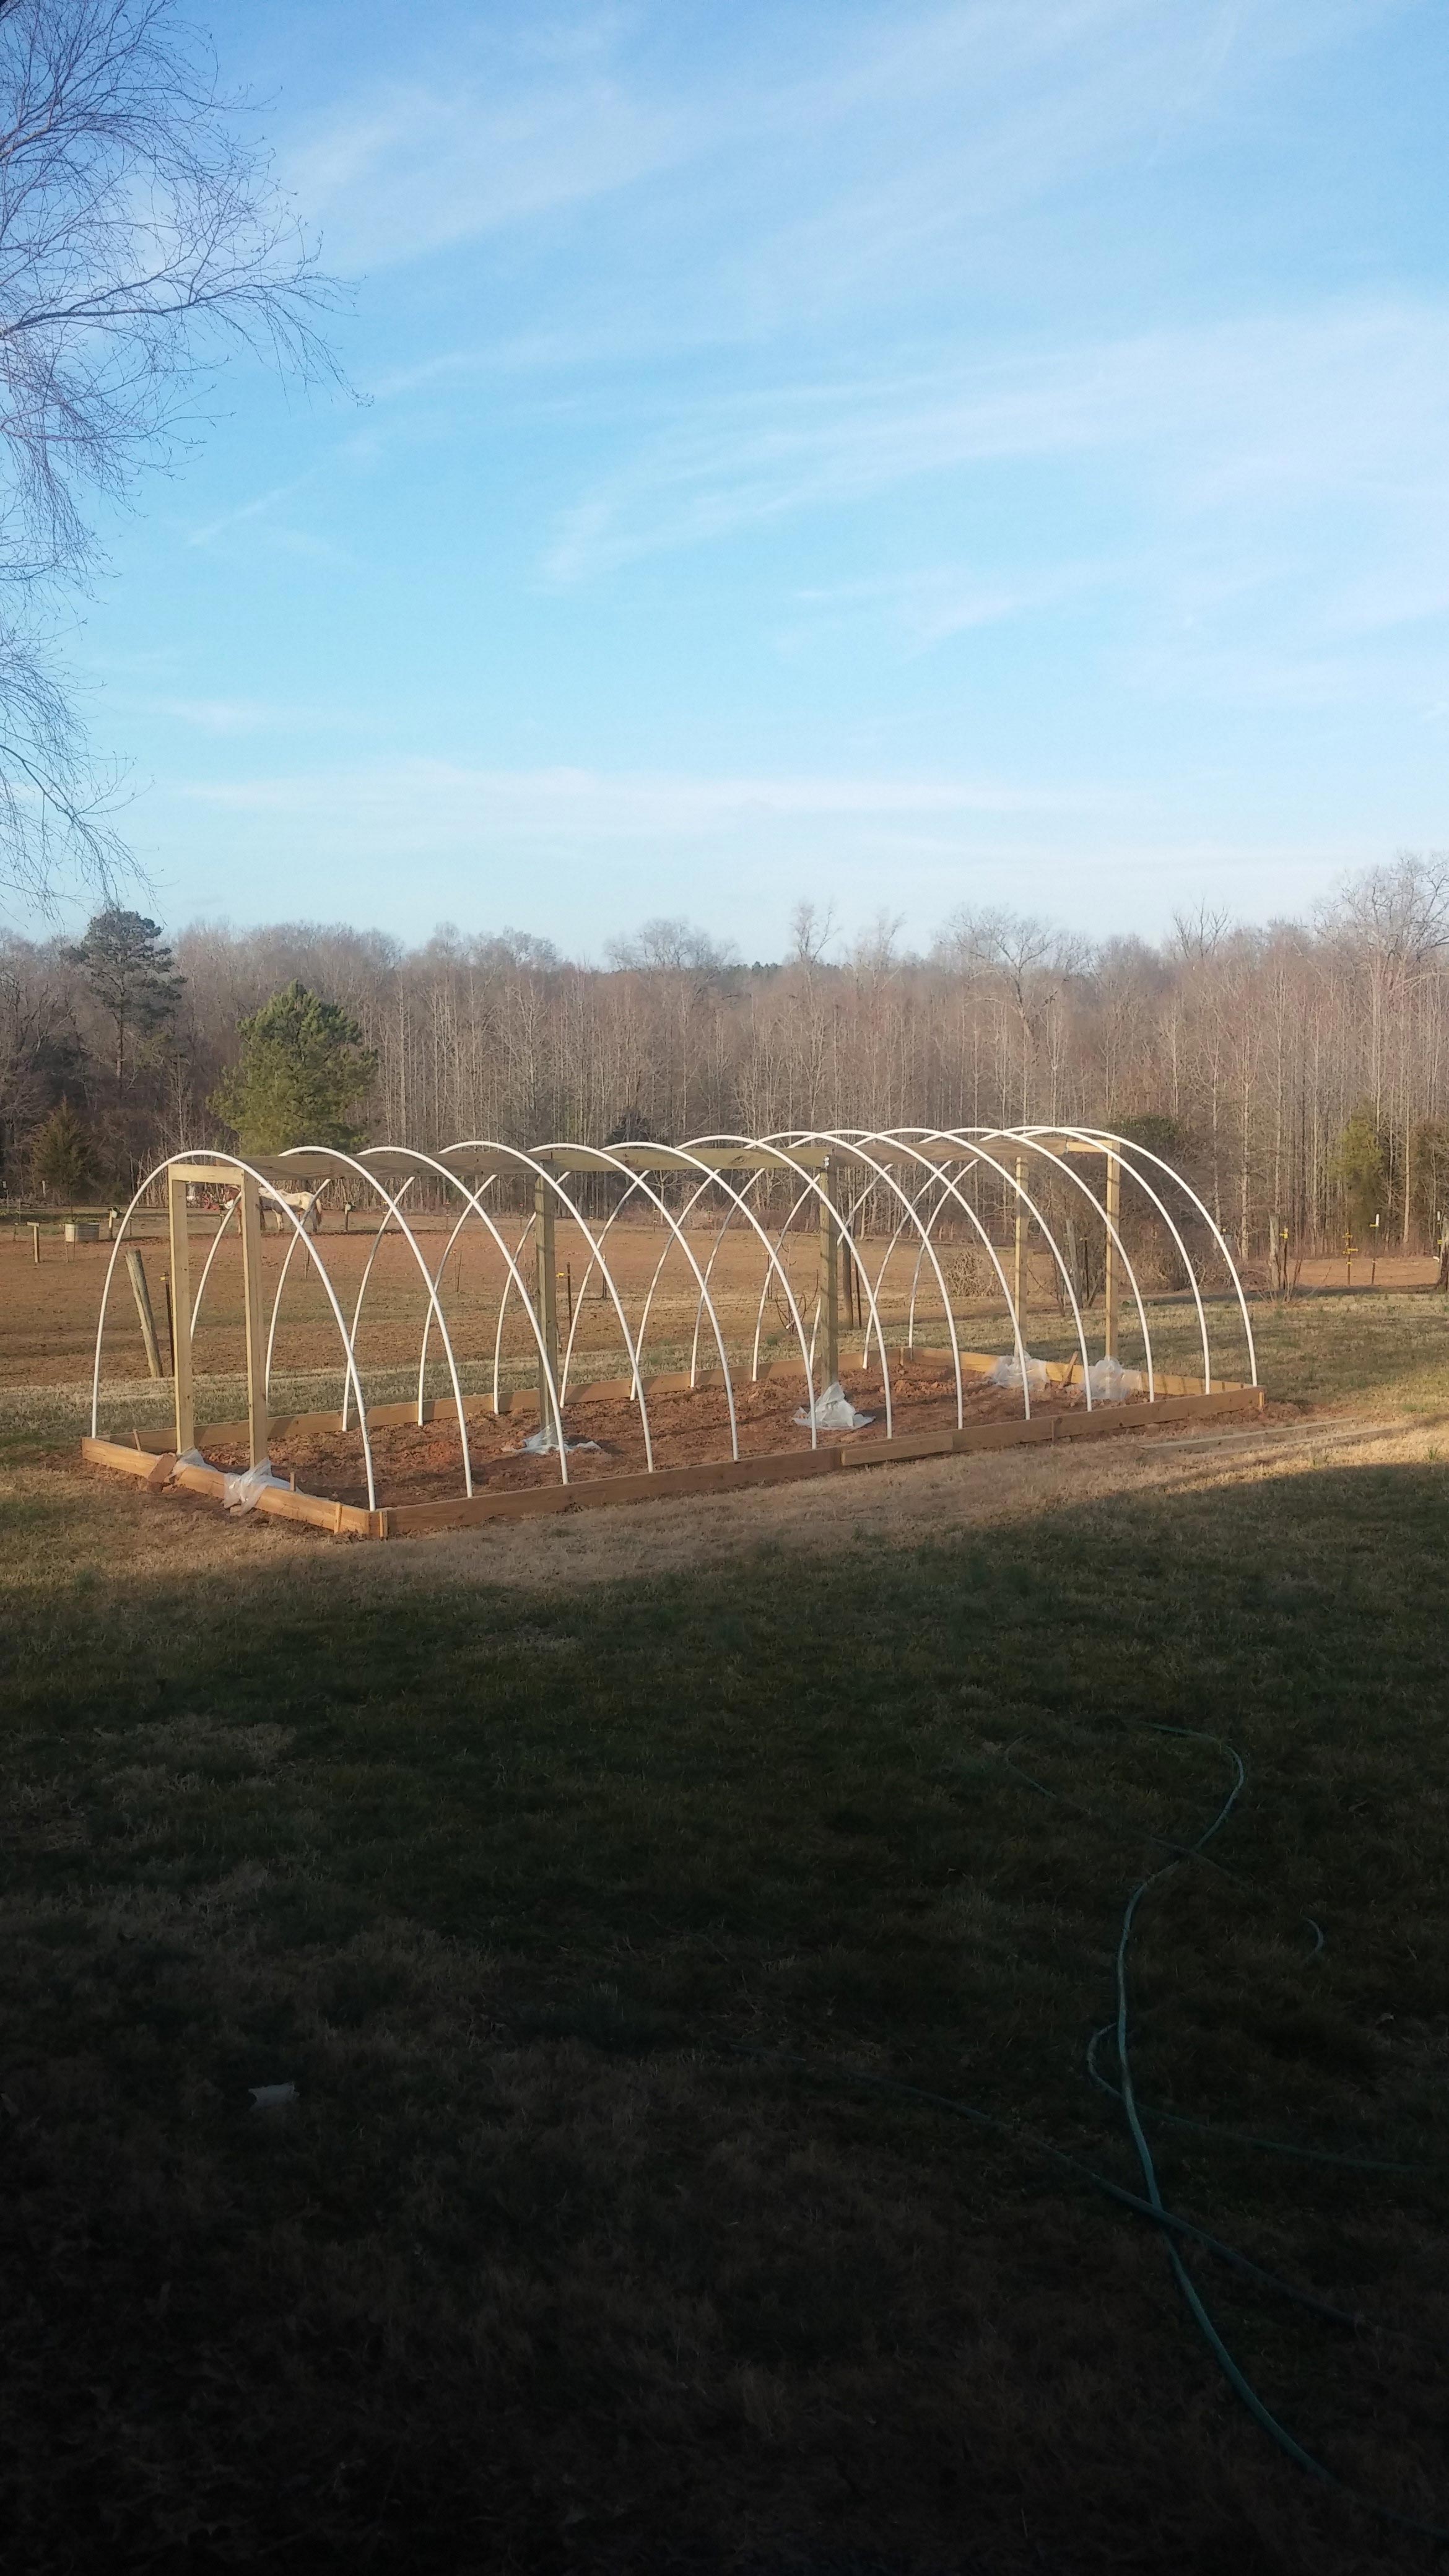
This is a 12'x24' design with a 6'8" ceiling height. You will want to keep the doors open all summer, and closed most of the winter. In total it is just shy of 300 sqft. I have a starting table, some tools and a few chairs to take it easy with friends and enjoy the view, so it's closer to 200 sqft of growing space. Still, plenty for me.

Tips For Picking Your Site:

  • How To Build A 300 Square Foot Windproof Greenhouse For Under $500Firstly, you will always want to run this East to West so that the southern sun can come through the long side.
  • If you are in the Northern states you will want to avoid shade until about 4 or 5pm during summer.
  • If you are below 40 degrees latitude, the sun is pretty intense and any poorly designed greenhouse can cook your plants.
  • Since this design does not include sides that roll up, Southern residents will want to incorporate a time or two where there will be shade from a tree or other structure. It's hot in North Carolina in general, and in summer I have a Hickory shade it from 9am to Noon, and a birch shade it from 4pm until 6pm. This cools the inside significantly, and using trees is a great idea since the leaves fall and more heat gets in as winter comes on.
  • Using an immovable structure for shade can create unwanted cold in the winter. Keep these on the North side to block wind and trap heat behind it.
  • Pick a level spot, or one that can be leveled.
  • Pick a spot that is up-slope of any drainage zones like hills or ditches, you do not want water coming under and getting your roots soggy.
  • Notice on the left edge of the photo that the low point of the afternoon sun in winter will still just touch the edge of the greenhouse.  Five feet left would have been a poorer choice.  Honestly, it took me two years staring at light angles to figure out where this should go, so don't rush it.

Tips For Prepping the Ground:

  • How To Build A 300 Square Foot Windproof Greenhouse For Under $500You will need to spend some time prepping the ground if you use the native soil as a base layer. This will include tilling in anything currently growing.
  • You can also roll out fabric and put soil on top, but I feel that limits growing deep rooted plants.
  • You will then want to check the PH of the native soil and amend as needed. A soil sample will not be necessary because this layer will be beneath 4 to 6 inches of good topsoil to be brought in.
  • Try not to mix the native soil with the stuff you bring in – this will keep the weeds down and help control any soil diseases.
  • I built mine in early Spring and used leftover wood ashes to amend the soil and adjust the PH. I felt this was a great natural and sustainable option over using lime. I also made a bonfire in the middle with branches from trimming a nearby birch, an equally sustainable choice for soil amending.  Went from 5.2 to 6.5.

The Build:

Note: All wood used is pressure treated and should be left outside in the rain away from the greenhouse site for a few weeks. If you can afford cedar or locust then do so, but it will definitely be over $500. If you are trying to certify organic, or practice 100% organic, you may not use pressure treated wood, but this design will still work great for whatever you choose!

The Base Frame

  1. How To Build A 300 Square Foot Windproof Greenhouse For Under $500You will need 6 pieces 2x6x12.
  2. Scab two together with a 2×4 to make a single length of 24' – repeat for the second side.
  3. Form a rectangle with the boards over your site.
  4. Check to make sure the frame is squared up – screw in the East side, stake it at the corners to hold it while you adjust the West side, then stake that side (place temporary wood stakes on the outside of frame )
  5. Using 3" screws connect the boards as shown – The 12" length needs to be inside the long sides so the hoops will be exactly 12' apart, ensuring adequate headspace in the vault.
  6. Admire how perfect all your angles are, fix any that aren't and take a break.

The Rebar Hoop Anchors

  1. How To Build A 300 Square Foot Windproof Greenhouse For Under $500You will need 26 pieces of 2 ft. reinforcing steel, or rebar. Use ½" (10mm) steel and buy 10ft. pieces if you can. If you have to buy 2ft. pieces that are pre-cut you will go over budget.
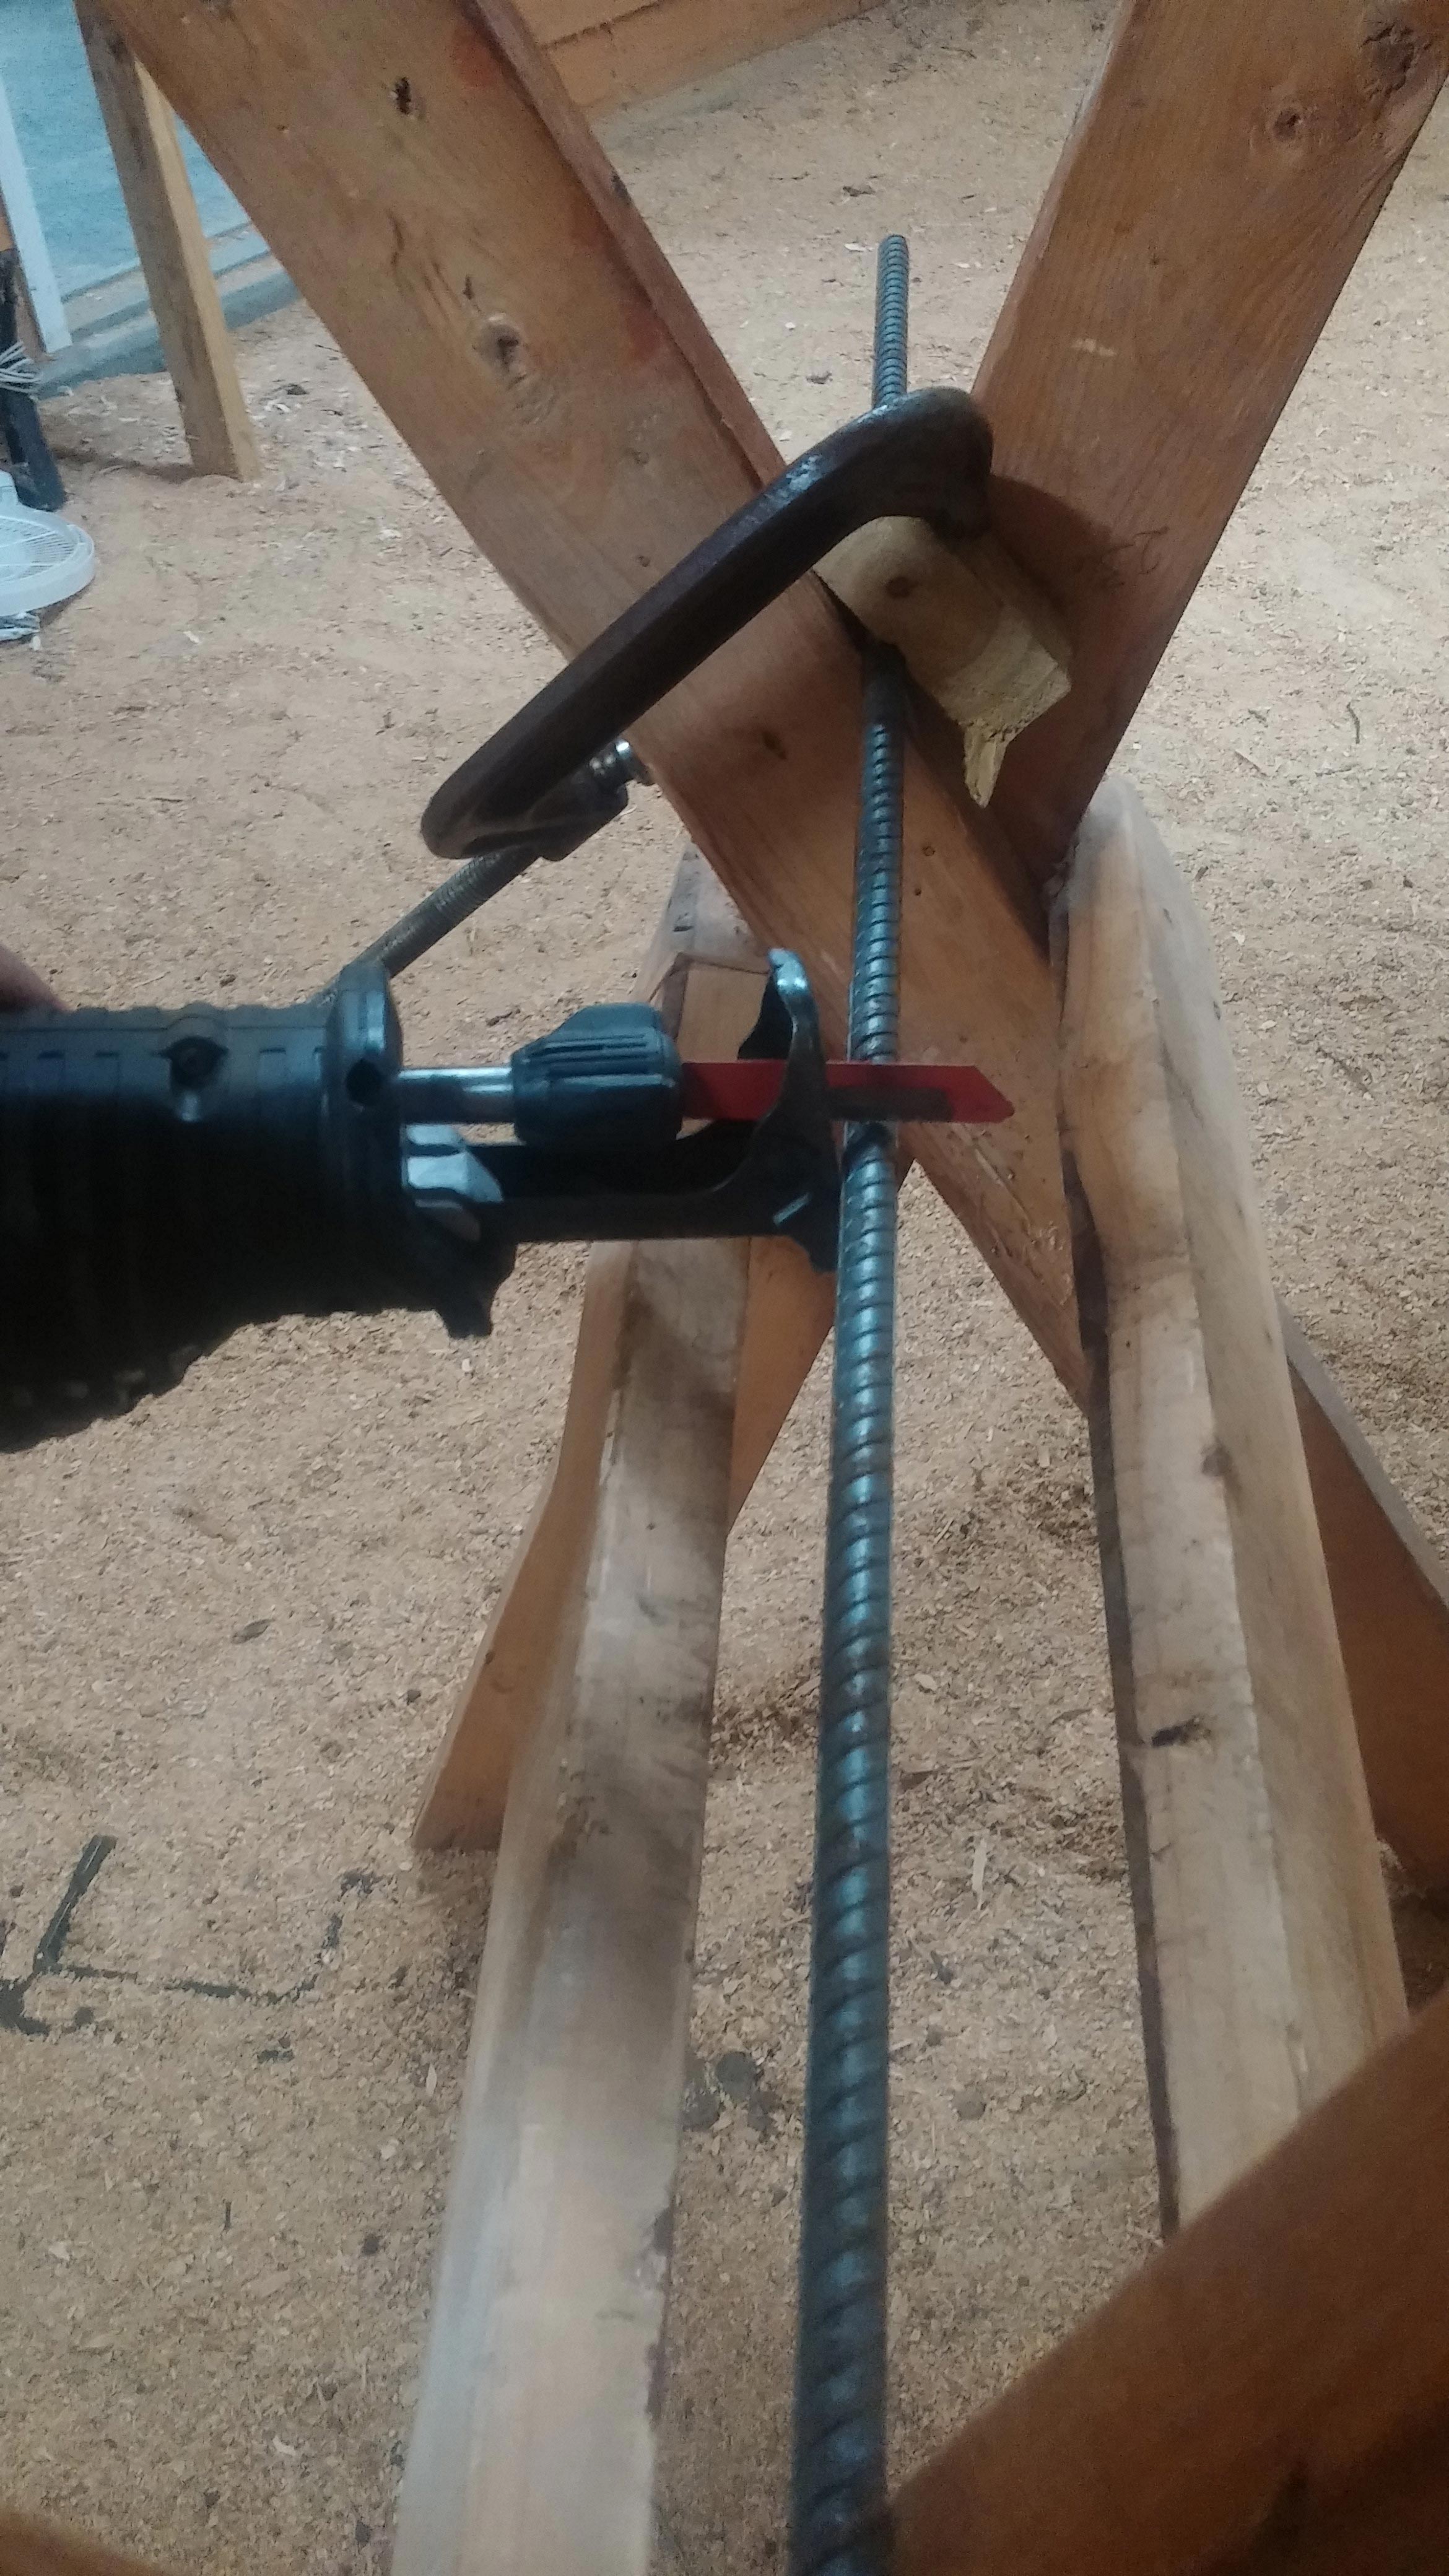
  2. Clamp the bars and cut them into 2ft. pieces with a reciprocating saw (use a metal cutting blade, $3)
  3. Pound rebar 1/8" away from the side of the bottom frame, at 2ft. intervals, starting and stopping at the corners. The gap is room for the hoop to slide on.

The Door Frames

We are going to plant the door into concrete post holes and then tie it to the bottom frame. This is a key part of the "windproof" factor. These door frames will also be buttressed against the ridge posts, and they don't budge one bit in a stiff Carolina wind.

  1. You will need (5) 2x4x8's and (2) 50lb bags of concrete.How To Build A 300 Square Foot Windproof Greenhouse For Under $500
  2. Build the door 3' wide and 8' tall using one top header and leaving the bottom end open.
  3. Find the center of your East and West bottom frames.
  4. Mark 1'6" in each direction, this will be the tie in point for the door frame studs.
  5. Dig a 1'6" hole flush with the endwall right where you marked for the studs.
  6. Plant the door into the post holes.
  7. Make sure it is level using the header board.
  8. Make sure the top and bottom studs are equidistant so the door goes on smoothly.How To Build A 300 Square Foot Windproof Greenhouse For Under $500
  9. Screw the studs to the bottom frame 2x6x12 board.
  10. Pour concrete into the post holes and let cure 1-2 days.
  11. Prop with 2×4 to keep plumb while drying.


The Ridge

How To Build A 300 Square Foot Windproof Greenhouse For Under $500This hoop house includes a center ridge with center posts. If you are not in a windy area, you can forgo this, but I wouldn't recommend it. It will increase the durability of the house, and that will make your plastic last longer. It does take away from what some people love about a hoop house, which is all that open space. However, I hang out with one or two other people in there just fine.

  1. You will need: (2) 4x4x8's (3) 2x6x8's (3) 50lb bags of concrete (6) 2×6 framing brackets.
  2. Dig post holes eight feet from the edges of where the doors will be.
  3. Attach framing brackets for the 2×6 center ridges. One on each Door frame and two on each post (photo).
  4. Make sure they are exactly center – 8 ft. from door and 6 ft. from the sides.
  5. Mix 1 bag of concrete.
  6. Place 4x4x8's into the post holes.How To Build A 300 Square Foot Windproof Greenhouse For Under $500
  7. Pour concrete and let cure for 1-2 days.  I was rushing to beat a week of rain, so I covered mine with plastic.
  8. Attach 2×6 ridges with an undercut for stability (see picture) and to keep the ridge uninterrupted for hoop placement.

The Soil

  1. Before the hoops go on you will want to add the soil. Select a good landscape supplier and take a look at the topsoil before you buy it. Not all "topsoil" is topsoil.
  2. If you save space for a table and chairs then 3 yards will do, you will need 4 yards if you fill the whole thing.
  3. On top of the soil, add 5 bags of peat moss, 6 bags of mushroom compost, and 6 bags of potting soil.  (Or you might have your own magic mix, I say go for it!)
  4. Till everything in evenly, avoiding the base layer of native soil and it's potential weeds/diseases.

The Hoops

  1. Go to the nearest actual plumbing supply store (not an Ace or Lowe's, no offense they just won't have it) and buy 13 20ft pieces of ¾" schedule 40 PVC.

Note: Any friendly supply store should be able to deliver that amount to you, but it may be a day or two out. If not, you will need special vehicle mounts, a trailer, or some ingenuity to bend them into a pickup. It is a felony in most states to travel with an improperly secured load, so please use common sense. DO NOT attach 10ft. pieces as a workaround, they will snap at the joint on this project.

  1. Place one end over the rebar and shove it about 1 inch into the soil, firmly planting it.How To Build A 300 Square Foot Windproof Greenhouse For Under $500
  2. Grab the other end and bring it over the ridge line to the opposing rebar stake and plant it firmly.
  3. Repeat with all hoops, careful not to manipulate them too much, causing damage or cracks.
  4. Using metal strapping, secure each hoop to the center ridge line, but leave them a little loose.
  5. Once all hoops are strapped, look down the sides to make sure they are even and adjust as needed.
  6. Once all hoops are even, return to the straps and tighten the screws so the hoops are immovable, but not overly tight as this is metal on plastic.
  7. Run high quality ducting tape over the top half of the hoop, including the metal straps.  This will eliminate a chemical reaction between polyvinyl and PVC piping.  Without it, your warranty on your greenhouse film will be void.  You may also purchase felt rolls from greenhouse suppliers…but again, that may put you over budget.  When you looked into an affordable DIY greenhouse, you knew their would be duct tape involved anyway!  Plus it looks great (see photo).

The Endwalls


Just a heads up, this is a complicated step and I called in a friend to help hold things.

  1. You will need (10) 2x4x6's.How To Build A 300 Square Foot Windproof Greenhouse For Under $500
  2. Make four small blocks like the ones pictured and screw them into the bottom side frame. Make it really tight up against that first hoop. This is where the endwall will tie in, making it possible without damaging the hoop in the process.
  3. Measure the distance between that block and the door stud and cut a 2×4 to place flush with the ground.  This is your bottom sill board.
  4. The hoop going over the endwall door should be strapped and screwed so it is flush with the outer edge of the door stud.
  5. Place two more studs and headers as shown in the photo to the right, spacing them evenly.  I did not included precise measurements down to the 1/8″ because each build is inherently different, and you may want a wider door or something else.
  6. Strap the end hoops to the corners of this new framing, making sure it rests on top, and flush with the outer edge.

The Plastic

This step requires additional help, ideally 3 people.  Do it on a warm day so the plastic can stretch.  You can find many suppliers online, just make sure it is designed for this purpose and not just a cheap roll of plastic.  Use nothing less than 6 mil and no more than 11 mil polyvinyl thickness.  The words "woven", "UV", and "anti-drip" are all good signs.  Here is where I would recommend for a great price and quick shipping for a high quality product.

  1. How To Build A 300 Square Foot Windproof Greenhouse For Under $500You will need the 20'x44′ roll. (3) bundles of wood lathe (1) box of wide head galvanized roofing nails.
  2. Roll the film out on a safe surface in the sun to let it stretch.
  3. Spread the film over the greenhouse and secure one side tightly with the lathe strips to the top of the bottom frame.  Notice how clean the edge should be (photo right).
  4. Move to the other side of the greenhouse and secure the other side tightly with lathe strips to the side of the bottom frame.  Major Tip: On a hot day, come back and tighten it down to the top by removing the lathe strips one at a time and re nailing them to the top – you will only have to tighten this one side, and this is the best way to avoid that unattractive sagging in the summer.
  5. Attach the plastic to the door header and the horizontal braces on each side.
  6. Keeping it tight, move the slack away from the door so it looks like a window and nail it to the door studs.
  7. Cut the plastic away from the door.
  8. Nail down the rest of the plastic to the framing, ensuring it is tight.
  9. I pulled mine from around the corner and nailed it to the outer stud.
  10. Then I pulled it back over the lathe on that stud to tighten the panel closest to the door
  11. I then put a second piece of lathe over the first.  This is the best way we found to make it look nice as well as stay tight.
  12. Finish it off by nailing it to the bottom frame.

The Doors

You will need a good eye or framing skills for this step. Make sure your hinges are exterior grade and your measurements are spot on. Leaks in the winter can only come from your door with this design.

  1. I used four corner braces, but any sturdy design will work.
  2. Once the door is assembled put on your hinges and mark the door stud accurately.
  3. Attach your door and ensure a good swing and seal (you will still likely need some kind of weather stripping here and there).
  4. Close the door and using the plastic cut out from the door frame, nail it down with lathe strips.
  5. Attach handles on both sides, and a latch.  I put a latch inside and outside on both doors so I can always lock it if I'm on the run.
  6. Go inside, close the doors, and feel the heat build up.  You've done it!

Shade Cloth

How To Build A 300 Square Foot Windproof Greenhouse For Under $500You just built this thing to trap heat, and now that it looks awesome, you are going to block the sun.  Even on commercial greenhouses shade cloths are implemented every year.  Grab a few rolls of landscaping felt, specifically the dark grey woven fabric used for weed tamping.  Run this fabric between the plastic and the hoops.  Cut strips and zip tie them to the second to last hoop on each end.  Use three or four running nearly the whole length.  This will create enough shade to cut the temperature by 10 to 15 degrees in the summer.  I add a midday watering time to help cool it down, making sure the plastic gets wet to dissipate some of the heat.  This will at most cost you $30 at Lowe's, whereas most shade cloth is upwards of $100.  Notice my shade cloth is mostly south-facing.

Planting Time!

There's no limits to your imagination now, I even planted some dwarf sunflowers in mine – an eye catcher for sure.  Let us know how your build goes!

How To Build A 300 Square Foot Windproof Greenhouse For Under $500


~A.