Friday, April 07, 2017

Underground Greenhouse • Nifty Homestead

Underground Greenhouse • Nifty Homestead

Underground Greenhouse

At most latitudes, the temperature six to eight feet below the surface stays between 50 and 60°F. An underground greenhouse uses calm below-ground weather to keep plants growing whether it's snowing or sweltering.

underground greenhouse
Underground greenhouse in Spetchley Gardens, UK. Stairs down to entrance on right. Image by Mezzapod via Flickr.

Designs for an Underground Greenhouse

underground greenhouse Underground greenhouse. The inside can be cased in stone, mud brick or any dense natural material able to absorb large amounts of heat. Cool weather crops like lettuce, kale and brocolli can be grown during winter in harsh climates. The glazing creates a "greenhouse effect." If your water table is high, obviously that could spell disaster. You should build your greenhouse at least five feet above the water table. This manual from GrowTest Urban Gardening has good information.

pit greenhouse Mike Oehler's underground greenhouse design. Mike digs a deep trench for access on the shaded south side which also allows cold air to sink and be warmed by the deeper, warmer soil. Many install tubes within the soil to transfer warmed air into the earth, yet Mike believes you need only the cold sink to allow the transfer in most climates. How to: motherearthnews. Mike Oehler's book: The Earth Sheltered Solar Greenhouse Book.

During the day, the earth walls store heat. The walls are the battery that release their heat at night. A properly-designed pit greenhouse is naturally warmed at night from five sides. In an above-ground greenhouse only one side, the floor, is heated during the day. A waterproof barrier extending along the periphery and down the berms are necessary. Here are a couple of earthbag underground greenhouse plans.

pit greenhouse Care must be taken waterproofing, draining and ventilating the greenhouse. The most efficient pit greenhouses have south-facing windows. The north wall stores heat.

pit greenhouse This earthen-walled underground greenhouse has lots of natural clay to absorb heat. The two most important factors in a pit greenhouse are the large amount of thermal mass (stone, soil, water), and its positioning toward the sun. Via organica.net.pl


Must-Haves For Greenhouse Owners

Potting Soil

Seedling Heat Mats


Underground Greenhouses Around the World

walipini An underground greenhouse is called a walipini in South America, from the Aymara Indian language, meaning "place of warmth." As you dig, you save your upper-most topsoil to serve as the bottom of the greenhouse. Use the deeper soil as the new berm on the north side (or south side if you're south of the equator). Angling your window 90 degrees to the sun on the winter solstice will allow the pit to store the most heat during those days when the sun shines the fewest hours.


Here is a large walipini in LaPaz, Bolivia. At two minutes they go inside the walipini, at four minutes they walk around the outside. In Spanish. Obviously they do not get much rain there.

underground greenhouse An underground greenhouse made of local stone in Nepal at almost 10,000 feet altitude, where the temperature falls below freezing 199 days per year.

underground greenhouse This pit greenhouse in Mongolia is currently producing food during three seasons of the year. As the footprints show the entrance is on the opposite side.

pit greenhouse Inside of above pit greenhouse. In a cold climate, the north, east and west walls should be well insulated. The north ceiling should be well insulated as well.

pit greenhouse A greenhouse built into a hill in Tennessee.

pit greenhouse This pit greenhouse is in Texas, it is essentially a hole dug into the ground. Here the soil was such hard sandstone, minimal wall support was necesary. How to build this underground greenhouse.

pit greenhouse Earth-sheltered greenhouse with earthbag walls in Patagonia. Note the use of plastic around the periphery.
A Nebraska couple turned an abandoned missile silo into an underground home. The walls are two feet thick—four feet thick in some places. The place where the missile was held is now the couple's garage. They've covered the ground with wooden flooring and plastic turf. Their underground greenhouse is the only place where natural light comes through. In the (massive) greenhouse they are able to grow tomatoes, garlic, potatoes, and green beans.

pit greenhouse Digging a shallow drainage ditch around the perimeter of the greenhouse will lead the run off water away from the structure. Via darfieldearthship.com

pit greenhouse Pit greenhouse. Many underground greenhouse owners store barrels of rainwater at the back of the greenhouse to soak up and store even more heat. Note the entranceway to right.

pit greenhouse Walipini is another name for a pit greenhouse, this one is topped with old windows.

pit greenhouse See step-by-step photos of a greenhouse in New Mexico dug by hand!
Ethan shows us his walipini or underground greenhouse in Cedar City, Utah. He says the greenhouse was built for $3,000. He describes losing a bunch of tomato plants because of snow not being cleared off the roof. He says condensation was also an issue. Now they are growing a new crop. He says you can do your starts much earlier with an underground greenhouse, you can even start things from seed. He shows water damage to the wall. The roof got some holes in it, because a goat walked on it, and water got through. Ethan also shows off the roof vent he built. The vent was necessary because in summer the greenhouse was far too hot.

pit greenhouse This mud brick walipini in Ladakh which produces food year-round in a very harsh climate.

Many More Uses for Your Underground Greenhouse

pit greenhouse This amazing couple turned an old gunite pool into a 'closed-loop food-producing urban greenhouse.' The greenhouse houses tilapia, chickens and hydroponic vegetables and fruits.

pit greenhouse An easy way to warm up and bring light into your basement. Build a mini-pit greenhouse on the south side of your home. naturalbuildingblog.com

underground greenhouse A pit greenhouse used as dining area.

pit greenhouse A pit greenhouse for musicians. (Missing video)

Part 1 of a video series about the construction of an underground greenhouse, by Homesteadonomics. The builder says he's doing it to extend his growing season, because he lives in an area with high winds, and because it seems like a cool project. He gets about 60% of the digging done by hand, a backhoe finishes the rest. Then he built a rough stairway, and poured a concrete footer. At the end of the video he does a nice job of showing what's next. As of writing he's in the middle of building; now he's up to part 5.

pit greenhouse At the New Alchemy Institute bioshelter, fish tanks and compost heat the greenhouse and adjoining house. Water is dense and holds heat even better than rock, soil takes third place in heat storage. The solar aquaculture ponds are above-ground, translucent tanks. The fertile pond water was used for irrigating crops.

pit greenhouse Driftless Farm Greenhouse by Roald Gundersen, Wisconsin. The larger you build your pit greenhouse the more efficient, as the temperatures inside of a small greenhouse can fluctuate quite quickly.

pit greenhouse Driftless Farm Greenhouse, Wisconsin. A 2800 s.f. straw-bale insulated solar greenhouse. The whole tree supports were made from site-harvested black locust, a fast-growing, sturdy and rot-resistant tree that's abundant throughout Wisconsin.

earth sheltered greenhouse Earth Sheltered greenhouse by Hiroshi Iguchi, Japan. A greenhouse that obviously does not completely close. Via fifthworld-inc.

pit greenhouse Greenhouse by Rob Stout, New Mexico. swsolardesign.com.

pit greenhouse Pit greenhouse attached to a home. Via solarinnovations.com
.

pit greenhouse Semi-underground greenhouse surrounded on two sides with a stone wall and earth behind. Via solarinnovations.com.

This incredible "Greenhouse in the Snow" is in western Nebraska, close to the Colorado border, and when the video was filmed (early December) it had been 1 below zero the day before. Yet, in the greenhouse, lemons are ready to pick. Inside the greenhouse the temperature was in the high 70s during the day, and only fell to 38 F at night. Tomatoes were growing. The greenhouse is 80 feet long, 16 feet wide, and 12 feet high. Russ Finch, the owner of the home, says, "the entire energy cost for the year is $600." The video shows a lemon tree so lush, they have to prop up the branches to keep them from crashing. He also grows sweet Meyer lemons. He shows a Valencia orange tree, a peach tree, roses, papaya, grapes, kiwi, figs. He grows a lot of cactus, too. The heating system is entirely geothermal, his only heating system is a small unit that circulates air heated by the ground.

underground greenhouse Greenhouse built into a hill. Via solarinnovations.com

underground greenhouse Pit greenhouses attached to stone buildings are also extremely energy efficient! See inside here: solarinnovations.com.

pit greenhouse Straw bales are a great insulator (an R-value of 1.5 to 3 per inch). Manure below ground will also help to keep these plants warm. Photo by Terrie Schweitzer, via flickr.

pit greenhouse Cold frame of old windows and straw bales. Placing manure or compost down below the layer of topsoil will help keep the area warm.

How to Build an Underground Greenhouse: Resources

Great step-by-step guide to building an earth-sheltered greenhouse with center work space/cold sink.

An underground greenhouse in Bozeman, Montana. As you can see in the video, there's snow on the ground there. But in this completely underground unit, he's growing peppers, radishes, chard, cilantro, basil and zucchini. He mentions that one day, even though it was 28 F outside, it got up to 117 F in the greenhouse (he forgot to throw open the doors). There is no outside heating, just a series of water barrels that help retain heat.

The partially-submerged YMCA Solar Greenhouse in Blacksburg, Virginia.

A clearinghouse of info on solar greenhouses from L. David Roper.

Mike Oehler's Earth Sheltered Greenhouse.

Photos of underground greenhouse construction in Kyrgyzstan.

How Joseph Orr built a mud heat-storage solar greenhouse that even heats an adjacent room.

A step-by-step look at building a cinder block underground greenhouse.

Photos of a bermed, solar-heated greenhouse in Southern Idaho.

Step-by-step construction photos of a small, earth-sheltered greenhouse.

Step-by-step instructions and designs for a quonset hut style greenhouse made from chain link fence top railings. You'll need a lot of land for this one.

If you're okay with this, here's how to build a greenhouse that's heated by an adjacent chamber of compost.

What life is like at the Solviva greenhouse, where it's 4 degrees outside but, inside the greenhouse, you can be plucking fresh tomatoes in 75-degree heat.

Best Books on How to Build an Underground Greenhouse

The Earth Sheltered Solar Greenhouse Book by Mike Oehler

Solviva: How To Grow $500,000 On One Acre by Anna Edey

The Winter Harvest Handbook: Year Round Vegetable Production Using Deep-Organic Techniques and Unheated Greenhouses by Eliot Coleman

Solar Greenhouses Underground by Daniel Geery

The Solar Greenhouse Book by James McCullagh

Gardener's Solar Greenhouse: How to Build and Use a Solar Greenhouse for Year-Round Gardening by Ray Wolf

More Underground Greenhouse Resources

Slope, orientation, glazing, etc: attra.ncat.org

Lots of info! L. David Roper: roperld.com

Compost heated greenhouses: attra.ncat.org

Wood greenhouse kits, they will make a kit for your foundation: cedarbuilt.homestead.com

Solar Greenhouse Links: builditsolar.com

Underground Greenhouse Video.......there's more on their site....


Sent from my iPad

How to scan and archive your old printed photos - CNET

How to scan and archive your old printed photos - CNET

How to scan and archive your old printed photos

Whether you're looking to reduce clutter or share fond memories online, here are four methods for digitizing your print photo collection.

Sharon Profis/CNET

Chances are you have a stack of photo albums collecting dust in a closet somewhere. Maybe they make for a fun coffee-table chat, but if you want to share your memories with friends and family online, or create a backup of your photos, where do you start?

There are several ways to go about digitizing your printed photo collection. Depending on how many photos you have and how DIY-eager you are, your choice will vary.

For the highest quality, use a scanner

In a dust-free environment, set up your scanning station. First, remove any dust or dirt from your prints with a microfiber cloth or alcohol-based cleaning wipe. Then, clean your scanner's glass with these simple instructions.

It's important that you thoroughly clean both the photos and scanner, as the scanner's sensitive sensor will pick up even a speck of dust on the glass or on the photo.

Before you scan the photos, consider the way in which you'll organize them. By date? By event? How will the files be named? The options are endless, but no matter which method you choose, choose a system before you scan, and organize your printed photos into stacks accordingly.

If you need some guidance, check out this guide to organizing your photos.

With that out of the way, you can begin scanning your photos. Because each printer manufacturer's scanning software is different, I can't offer step-by-step instructions, but here are some tips:

  • Scan multiple photos at once. On an average-size scanner bed, you should be able to scan four 4x6-inch photos at once, and crop them later. Some scanners even come with software that do this automatically for you. Use this method to cut down scanning time.
  • Select a resolution of at least 300 dots per inch, and up to 600 dpi if you plan to order enlargements.
  • Take advantage of editing options. Most scanning software will allow you to crop, adjust color, adjust brightness and remove red-eye.

If you want to store those photos in the cloud for anywhere access, here's our guide to choosing an online storage service for photos.

Use your phone to scan photos

Google recently released PhotoScan for Android and iOS devices built specifically for this task. Naturally, you'll want to use a phone with a high-quality camera such as the Pixel, Galaxy S7 or iPhone 7 to ensure you capture the best possible scan.

The PhotoScan app takes more than one photos of a physical picture, then uses fancy computing techniques to remove glare from overhead lighting. For complete instructions detailing how to use PhotoScan, be sure to read through Matt Elliot's post.

Another option for using your phone is to download and install Shoebox from Ancestry.com, a free app for iPhone and Android. Once you sign up, you can begin scanning your photos. But, before you do, here are some tips for prepping your assembly line:

  • Dust off your photos with a microfiber cloth, or an alcohol-based cleaning wipe for really dirty prints.
  • Find a well-lit area with lots of natural light and few shadows.
  • Clean your phone's camera lens with a microfiber cloth, or a cotton swab and a drop of isopropyl alcohol.

Now you're ready to "scan" your photos with your phone. Launch Shoebox and hit the green camera button. Then, with the photo laying down, position your phone so that it's parallel to the photo. Finally, tap to focus and hit the shutter button.

From there, crop the photo by dragging the crop lines. Then add extra information, like when the photo was taken, who's in it, and a brief description. Finally, you can upload the photo to your account.

Repeat the process for the additional photos. All scanned photos will be saved to your camera roll and be made available online via your media gallery on Ancestry.com.

Now you can post the photos on Facebook or store them in your preferred photo storage site, such as Flickr or Dropbox.

This won't replicate the quality of the first method, but it's good if you want to scan photos in a pinch or don't own a scanner.

Use a macro lens for film

According to an old (but still applicable) post on PetaPixel, you can do it at home using a dSLR camera outfitted with a macro lens. The process requires you to take a series of photos of the film, focusing on different sections of the film for each shot. After taking the proper number of shots, you then use software to combine the photos, creating a digital version of the film.

Now, we realize the number of readers who readily have access to such a setup is likely low, but this tip is still worth mentioning. The reason? Smartphone camera lenses from the likes of Olloclip and Photojojo. Each company offers a macro lens attachment for iOS or Android, which should be more than sufficient to duplicate this process. Granted, the photo quality of a smartphone isn't going to be anywhere near that of a dSLR camera, but for most, it will suffice.

Let someone else scan your photos

If all of this sounds like one giant headache, consider outsourcing your photo scanning to a professional, paid service. For example, Scanmyphotos.com scans, crops, edits and archives your photos starting at $0.16 apiece, depending on the scan quality you choose. Alternatively, the company can send you a box that you fill up and it scans for a flat rate of $145. According to ScanMyPhotos, it typically holds 1,800 photos.

DigMyPics.com and ScanCafe.com are two other options worth comparing.

Editors' note: This post was originally published on June 12, 2012, and has been updated to include new information.


Sent from my iPad

Thursday, April 06, 2017

Mini Candied Meyer Lemon Cakes Recipe

Mini Candied Meyer Lemon Cakes Recipe

Mini Candied Meyer Lemon Cakes Recipe

These delicate little cakes seem perfectly suited for a dainty tea party, fancy brunch, or the sweet ending to a memorable meal. No one will ever guess they came from a boxed cake mix and premade frosting! But, to be fair, the Vanilla Cake Almond Flour Mix and Organic Vanilla Frosting are from Simple Mills, a company that specializes in delicious and healthy gluten-free baking mixes and ready-to-eat snacks. In other words, these aren't your average baking shortcuts. The vanilla cake mix in this recipe is made from just six simple ingredients: almond flour, organic coconut sugar, arrowroot powder, organic coconut flour, baking soda, and sea salt. The vanilla frosting doesn't contain many more than that—and both are free of gluten, grains, soy, corn, dairy, and gums or emulsifiers so they're Paleo-friendly as well as gluten-free and vegan!

Mini Candied Meyer Lemon Cakes Recipe

Yield: 6 mini cakes
Active Time:

Ingredients

For the candied lemons
1 cup water
1 cup sugar, plus ¼ cup for sprinkling
4 to 5 sprigs of thyme, plus more for garnish
2 Meyer lemons, thinly sliced

For the cake
3 eggs
⅓ cup grapeseed oil
1 tablespoon vanilla extract
⅓ cup water
1 Meyer lemon, zested and juiced
1 box Simple Mills Vanilla Cake Almond Flour Mix
1 jar Simple Mills Organic Vanilla Frosting

Instructions

Make the candied lemons
In a large skillet over medium heat, add water and sugar. Bring to a boil then turn down heat; let simmer until sugar is dissolved. Add thyme and Meyer lemons. Simmer for 30 minutes, until rinds have softened and are slightly translucent. Remove lemon slices to a sheet tray lined with parchment. Let stand at room temperature until dry but slightly tacky to the touch. (These can be made ahead and stored in the refrigerator in an airtight container for several days.) When ready to use, sprinkle both sides of the lemon slices with sugar.

Remove thyme from the skillet. Continue simmering until the liquid has reduced by a third, forming a syrup. Turn off heat and let cool slightly. (This lemon syrup will be used to top your cakes later.)

Make the cake
Preheat oven to 350 degrees. Follow the instructions on the package. Add Meyer lemon zest and juice to the batter. Pour into a 9 x 13-inch sheet tray lined with parchment paper and greased. Bake for 20 to 25 minutes or until inserted toothpick comes out clean. Remove from oven and let cool.

With a round cookie cutter, cut out 12 rounds. Transfer cut rounds to a platter. Drizzle half of the rounds with 2 teaspoons reserved lemon syrup. On the same rounds, pipe frosting in a circle to cover. Top the frosted rounds with the unfrosted rounds, forming mini stacked cakes, and drizzle the top of each cake with 2 more teaspoons of syrup. Pipe frosting onto the center of each and top with a candied lemon slice and a sprig of thyme.

Recipe by: Angela Gaines
Photo credit: Paul Delmont


~A.

How to Grow and Care for Madagascar Jasmine | Dengarden

How to Grow and Care for Madagascar Jasmine | Dengarden

How to Grow and Care for Madagascar Jasmine

Madagascar Jasmine or Wax flower is a heavily perfumed climber. The waxen flowers appear in groups or 'pips' along the stems.

Madagascar Jasmine or Wax flower is a heavily perfumed climber. The waxen flowers appear in groups or 'pips' along the stems.

The name Stephanotis comes from the Greek words stephanos, a crown and otis, an ear, probably referring to the way the flowers are formed in bunches. There are some fifteen known species of this evergreen climber, but only one species is grown as a house plant to any extent. This is Stephanotis floribunda, popularly known as Madagascar Jasmine or wax flower, which was introduced from Madagascar in 1839.

The strongly scented white, waxy flowers, much used in wedding bouquets, corsages and button-holes, are produced in clusters in spring, and may continue through summer, on an evergreen climbing shrub, which can grow to perhaps 15 ft (4.5 m).  Although the stems get very long, it can be kept under control and encouraged to flower by careful pruning and training the leading growths around a hoop of wire or cane.

Madagascar Jasmine is not the easiest of plants to grow in the house, but if kept in a window where it can receive good light, it will flower well.  It is really better suited to a greenhouse or conservatory, where it looks its best when trailing along a rafter with the clusters of lovely white flowers hanging down delicately.

When buying, look for good, healthy, green foliage.  The plant should have two or three clusters of flower buds, preferably with one or two flowers just opening.  Look out for and reject plants that have dropped some of their flower buds.

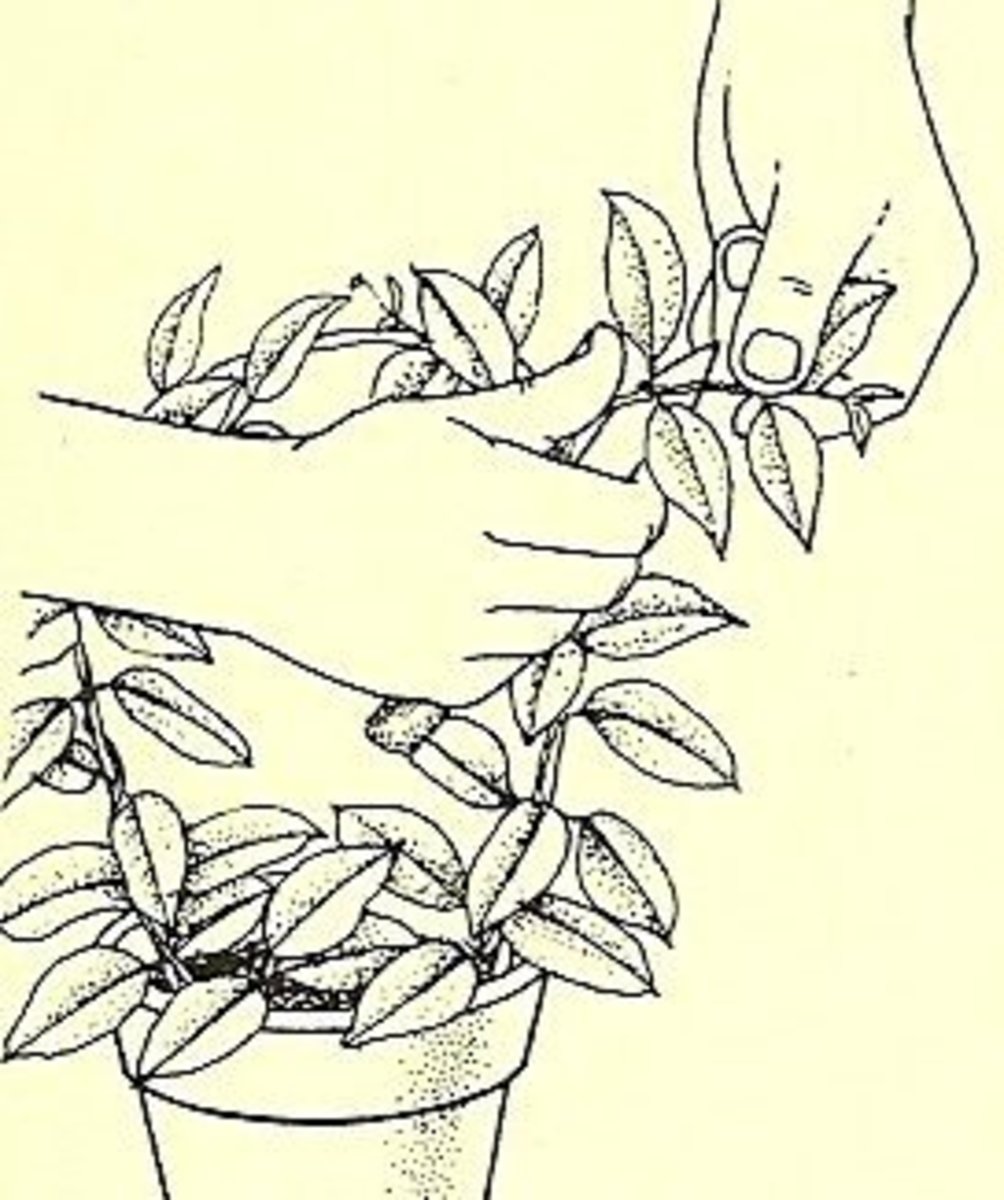
How to take stem tip cuttings

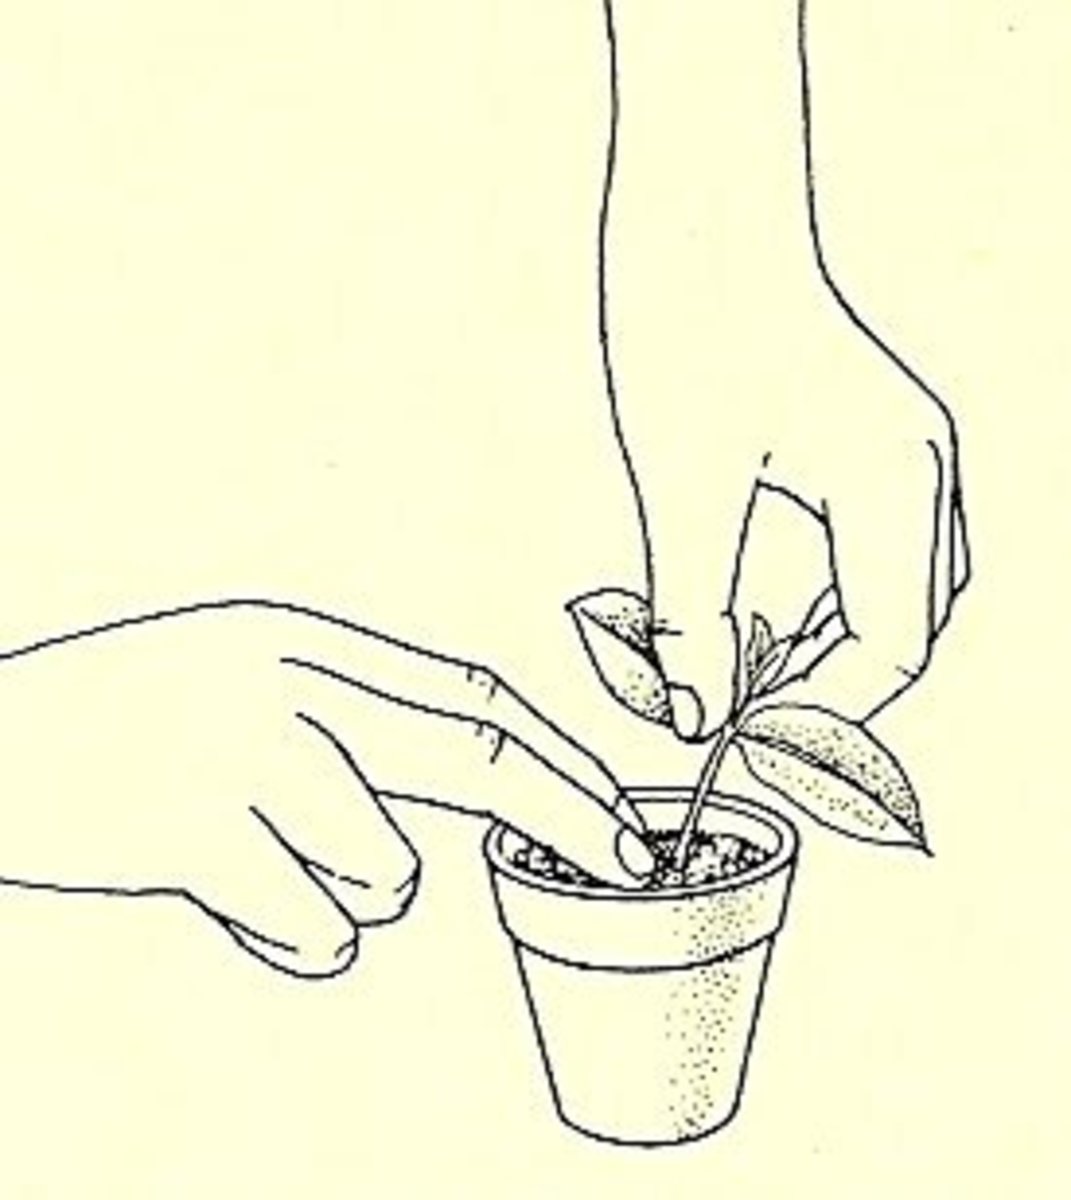
1. Take cuttings in spring using stems that grew the year before. Prepare pot or propagator with equal parts peat moss and coarse sand or perlite. 2. Choose shoot or stem tip with 2 pairs of healthy leaves and a growing point. Cut off below 2nd pair

1. Take cuttings in spring using stems that grew the year before. Prepare pot or propagator with equal parts peat moss and coarse sand or perlite. 2. Choose shoot or stem tip with 2 pairs of healthy leaves and a growing point. Cut off below 2nd pair

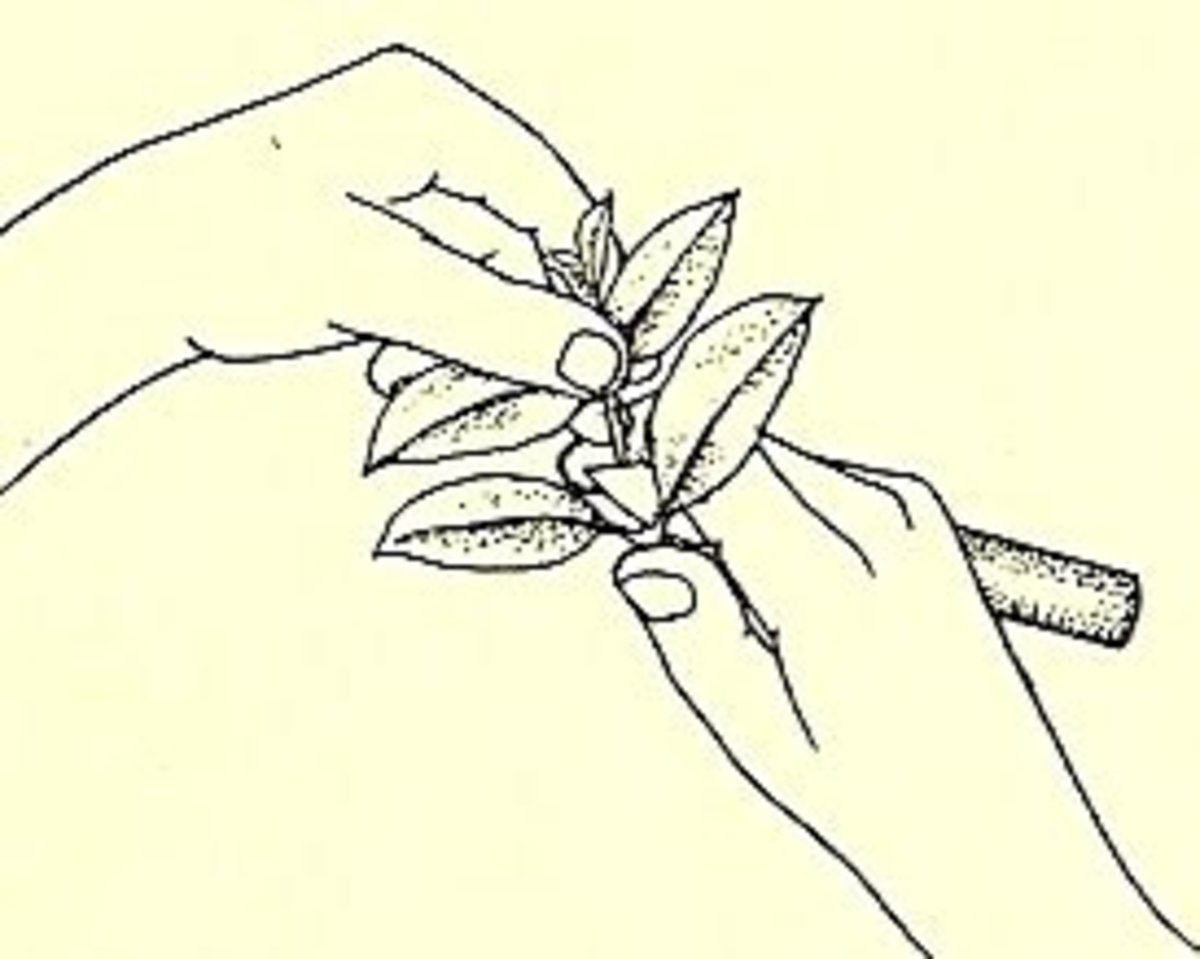
3. Prepare cuttings by trimming off stem just below a leaf.

3. Prepare cuttings by trimming off stem just below a leaf.

4. Remove the lowest pair of leaves.

4. Remove the lowest pair of leaves.

5. Dip the cut surface in hormone rooting powder. Shake of the excess.

5. Dip the cut surface in hormone rooting powder. Shake of the excess.

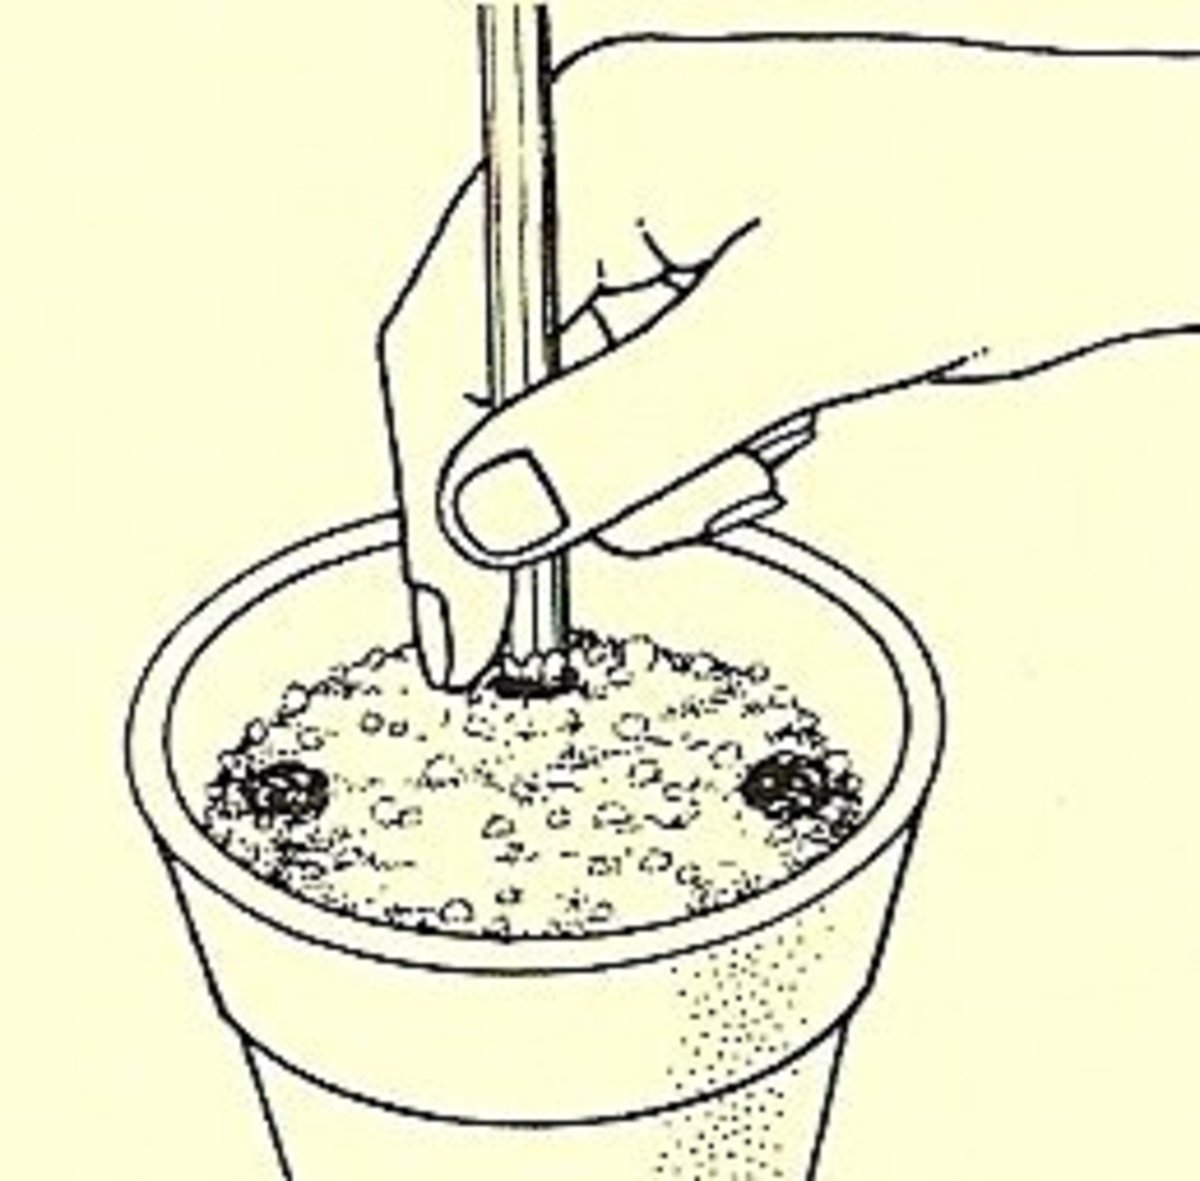
6. Make small holes in potting mixture around edge with stick or pencil.

6. Make small holes in potting mixture around edge with stick or pencil.

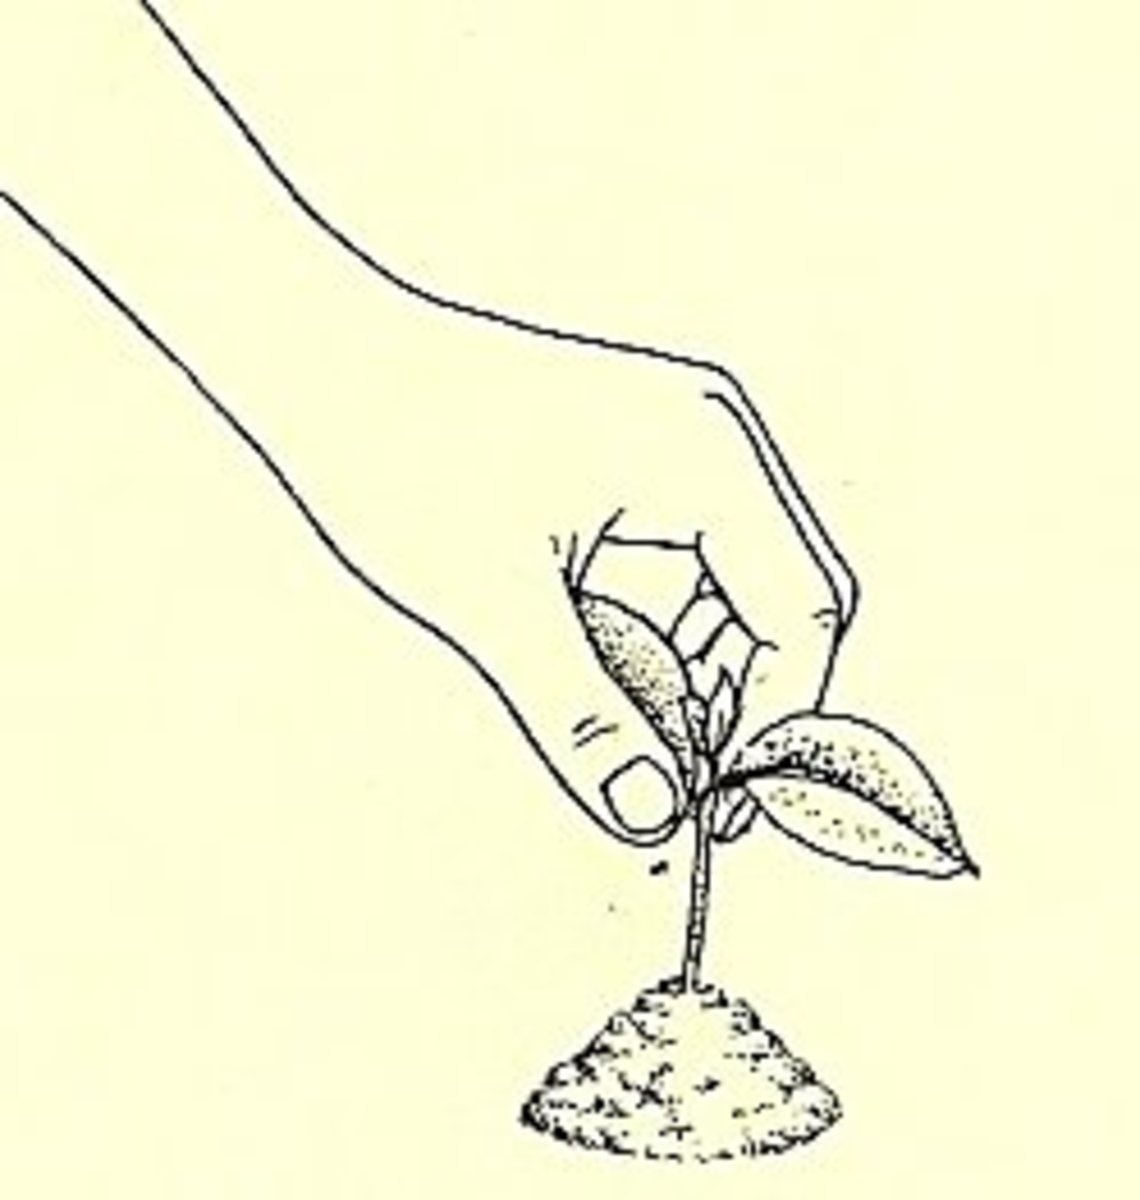
7. Insert cutting so that end of stem is at bottom of hole and leaves are level with potting mixture.

7. Insert cutting so that end of stem is at bottom of hole and leaves are level with potting mixture.

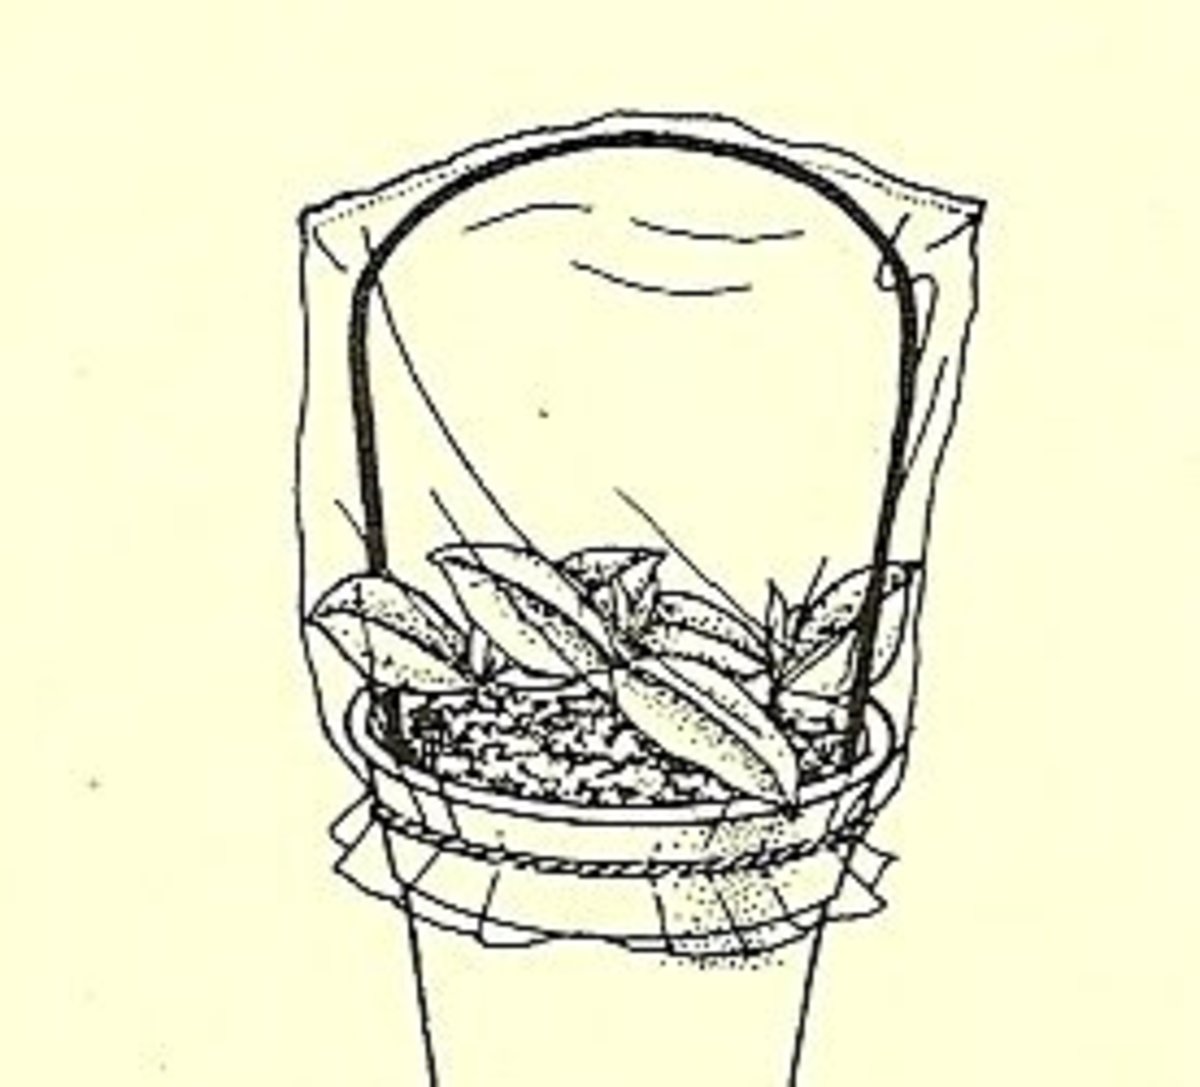
8. Water and cover with plastic bag supported by wire. Remove cover for 5 minutes a day and never let potting mixture dry out. Keep at 70 degrees F (21 degrees C). Remove after 21 days. When cuttings are growing well, re-pot in normal mixture.

8. Water and cover with plastic bag supported by wire. Remove cover for 5 minutes a day and never let potting mixture dry out. Keep at 70 degrees F (21 degrees C). Remove after 21 days. When cuttings are growing well, re-pot in normal mixture.

Stephanotis floribunda.

Stephanotis floribunda.

Proper care guide

Atmosphere:  Madagascar Jasmine appreciate a ventilated, but not draughty, position free from gas fumes.

Cleaning:  Wipe the leaves occasionally with a damp cloth. Never use leaf shine.

Feeding:  Apply standard liquid fertilizer every 14 days during spring and summer when the plant is growing and flowering.

Humidity:  They should be sprayed every day with lime-free, tepid water in summer, but do not spray the flowers.  Stand the pot on damp pebbles to provide constant humidity.

Light:  Provide plenty of bright light, but keep the plants out of direct sunlight, which will damage the foliage.

Potting and re-potting:  Potting should be done in late winter, using a soil-based potting mixture.  Move plants into pots one size larger in early spring.  After the first 2 years, re-pot after pruning (see below) every spring.  Mature plants can generally be accommodated in 5-6 in (12-15 cm) pots, but move healthy plants that continue to grow into 8-9 in (20-23 cm) pots.  If the plant gets too old or difficult to move, just replace the topsoil in the pot or tub with fresh potting mixture.

Propagation:  Take 3-4 in (8-10 cm) long tip cuttings from non-flowering lateral shoots in spring or early summer.  Dip the cut ends in hormone rooting powder, and plant each cutting in a 3 in (7.5 cm) pot containing equal parts of peat moss and coarse sand or perlite.  Enclose the potted plant in a plastic bag or heated propagating case and keep it at a temperature of around 65° F (18° C) in bright light without direct sunlight.

Given just enough water to keep the potting mixture moist, rooting should occur in 8-10 weeks.  When the new roots are well developed, move the cuttings into the normal soil-based potting mixture used for mature plants.  (See step-by-step photos at right).

Pruning: Cut back any straggly leading growths by about half if necessary, and cut the side shoots back to spurs of 3 in (7.5 cm) or so. Cut out all weak shoots. This is best done in spring.

Temperature: The ideal summer temperature for stephanotises is 65° - 70° F (18° - 21° C), but they also do well in warmer rooms, given high humidity (see above). The maximum summer temperature is 80° F (27° C). In winter, keep them slightly cooler at 55° F (18° C).

Watering: In summer, water plentifully as often as necessary to keep the potting mixture thoroughly moist. In winter, water sparingly once a week. Use lime-free, tepid water when possible.

As an outdoor plant

In frost-free climates, the Stephanotis floribunda can be grown against a sunny wall or over an arbor or pergola.

What goes wrong

Problem

Cause

Treatment

Young leaves turn yellow

Chlorosis from lime in the water

Water once with a solution of sequestered iron and then water only with lime-free water

Flower buds shrivel

Too dry

Water more often

Flower buds drop

Plant has been moved about or the pot turned

Leave it alone

Leaves turn yellow

Too dark

Move plant to lighter place

Brown scaly insects on stems and under leaves

Scale insects

To prevent all these, spray monthly with malathion. Scale and mealy bug can also be

Leaves turn slightly yellow and have webs underneath

Red spider mite

removed individually with a swab dipped in methylated spirits. The plant will be more

White, woolly patches on stems and leaves

Mealy bug

resistant to insect attack if it rests in winter at 55 degrees F (18 degrees C)


~A.

Top 10 Weight Loss Tips | John Douillard's LifeSpa

Top 10 Weight Loss Tips | John Douillard's LifeSpa

Top 10 Weight Loss Tips

by on | 10 Comments

Average Reading Time: 7 minutes and 24 seconds

With spring upon us, this is the time to reset our ability to burn fat. Each season and its harvest has an important role in maintaining good health. Winter stores fat, proteins, vitamins and minerals to rebuild and insulate. Spring, as illustrated by its low fat harvest and austere menu, naturally forces us to burn stored fat cells for energy. This triggers fat cell detoxification, which is a requirement for weight loss.

Don't get me wrong, the benefits of fat burning far outweigh our weight loss obsession. Being a good fat burner does not depend on whether you are fat or skinny. We have lost our ability to burn fat as a culture, and that is a real problem. Let me explain why we all need to reset our fat burners. The benefits of fat burning are huge and go way beyond weight loss!

  • Fat is a calm fuel that burns slow and keeps the mood stable.
  • Fat burning neutralizes the toxic acids that are caused by stress.
  • Fat cells are where we store toxic heavy metals, fat soluble chemicals, pesticides, preservatives and environmental pollutants like estrogenic plastics. When we burn our fat cells, we continually detox.
  • Fat burning stimulates lymph drainage.
  • Fat is a long-lasting fuel that builds endurance, stamina and reduces cravings.
  • Fat burning allows deep sleep through the night.

Top 10 Weight Loss Tips

TIP 1: GRAPEFRUIT weight loss tips grapefruit halves image

Grapefruit is one of nature's fat metabolizers. (9) They are coming into season right now, so don't miss them. Remember the old grapefruit diets, where you ate nothing but grapefruits? That diet had merit but it was too extreme. I suggest eating just 1 or 2 a day. They are great for breakfast as a "fast breaking" food. Grapefruits support the momentum of burning fat that is established by having an early supper and no snacks through the night. This effect will continue through the morning as the grapefruit forces a metabolism that burns fat, stabilizes energy and balances blood sugar. (9) Add raw honey for best results (see why below).

TIP 2: RAW HONEY

Honey is another natural fat metabolizer according to Ayurveda. (10) Unlike most sweets that create highs and lows in blood sugar, honey, according to Ayurveda, supports energy and normalizes cravings by forcing fat metabolism and detox. It should be taken only in small quantities, and only by those with very stable and healthy blood sugar levels. (10) For this to work, however, the honey must be RAW, which means not cooked, not pasteurized and not heated. Raw honey also scrubs toxins (ama) off the intestinal wall and fat cells. If honey is heated for any length of time or cooked (such as in muffins, bread or desserts) it will not burn fat or detoxify toxic fat cells. In fact, if cooked, the honey actually becomes ama, a toxic hardened material basically comprised of undigested food. In my book The 3-Season Diet, I tell the story about beekeepers that sprayed diluted honey on the hives to calm the bees before managing their hives. According to this report, when the beekeepers used cooked honey to spray the hives, all the bees where dead within 20 minutes. If raw honey was used, on the other hand, the bees were fine and docile.

TIP 3: WATER

Water is a critical tool for encouraging better fat metabolism. A study showed that drinking 500ml of water (a bit more than 16 ounces) increased thermogenesis (heat production) by 30 percent. (1) This increase of metabolic activity before a meal will support more efficient digestion and fat metabolism. In Ayurveda, it is recommended to drink 1-2 glasses of water 15-20 minutes before each meal. The water allows the stomach to be hydrated so it is more willing to robustly produce the hydrochloric acid (HCl) needed to digest a big meal. HCl ensures that what enters the stomach is properly broken down and absorbed in the small intestine. If the stomach is dry or dehydrated, it won't produce enough HCl for optimal digestion because that much-needed acid would end up burning the stomach lining. Squeeze a little fresh lemon juice in your water before a meal for an extra fat burning boost (see why below).

TIP 4: TREAT GLUTEN INTOLERANCE – RATHER THAN AVOIDING GLUTEN

High insulin levels caused by poor diet and eating habits tell the body to store fat. Low insulin levels are one of the major factors associated with weight loss. Breads are usually public enemies for losing weight because of the hard-to-digest gluten content and their impact on insulin levels. Many get results by avoiding breads and gluten altogether to lose weight. This strategy treats the symptoms of gluten intolerance, but it is essential to find out why the gluten is not digested in the first place. I have reported on this in detail in my book, Eat Wheat.weight loss tips toasted bread imge Good news! Some grains do have surprising benefits when it comes to weight loss. Sourdough and rye bread have been reported to balance insulin levels. (2,3) The sourdough culture helps to break down the hard-to-digest gluten protein. TIP: Toasting breads helps lower the impact of gluten on the digestive villi by making it easier to digest.

TIP 5: SALAD DRESSING IMPROVES DIGESTION AND LOWERS INSULIN

Taking vinegar before each meal helps support blood sugar and lower insulin levels, which typically spike after a high starch meal. (4) The vinegar is a weak ascetic acid that fires up the digestive acids needed to break down a heavy starchy meal. The Italians often start each meal with balsamic vinegar. If you're not a balsamic vinegar buff, just add more vinegar to your salad. If vinegar isn't your thing, Ayurveda suggests a few simple recipes to boost HCl production in the stomach:

  • Lemon juice does basically the same thing as vinegar and makes a perfect salad dressing with raw honey.
  • Lemon juice can also be used alone, on food, or in some warm water that you sip with the meal.
  • To really boost digestive strength, slice ginger root into dime-sized slices. Sprinkle the slices with natural salt (Himalayan, Redmond or Celtic salt) and fresh lemon juice. Eat two before each meal.

TIP 6: GREEN TEAweight loss tips green tea image

Drinking green tea with meals, as the Japanese and Chinese do, helps decrease the absorption of excess fat. (5) White, green and black teas regulate the enzyme lipase, which breaks down fat. These teas have been shown to stimulate fat burning genes and aid in weight loss. (6) Antioxidants in white, green and black tea also neutralize the toxic chemistry of stress. When caffeine is taken with a meal, such as green tea, the caffeine acts as a digestive stimulant and may be beneficial for the efficiency of digestion. Notably, the same caffeine on an empty stomach can be depleting to the adrenals and digestion.

TIP 7: SPICES

A little spice with each meal can slow the absorption of white sugar and increase the amount of calories burned during each meal. (7) Peppers, ginger, turmeric, cayenne and digestive herbs like trikatu help support natural HCl production. (8)

TIP 8: SIP HOT WATER

Sipping hot water every 10-15 minutes all day for two weeks acts as a digestive cleanse and a lymphatic flush. This is one of the best techniques to treat dehydration, which is a major factor in weight gain. Dehydration triggers a survival response in the body that chemically tells the body to store fat. Proper hydration supports the bicarbonate lining of the stomach that protects it from being burned by digestive acids. If the body is dehydrated, this water-based bicarbonate layer will dry out and the tummy can ache. If it isn't treated quickly, the stomach will soon be told to make less digestive hydrochloric acid (HCl), which means that food will no longer being properly digested. My favorite test for dehydration:

  • Sip hot water every 10-15 minutes for just one day. If you are not craving and thirsting for more hot water by the end of the day, you are probably not dehydrated.
  • If you are dehydrated, you will crave more because the hot water will hydrate, dilate and stimulate micro-circulation and lymphatic drainage. This will rehydrate the tissues as the body absorbs the water and you will get thirsty for more.
  • If you are thirsty for more hot water after one day – continue for 2 weeks to totally rehydrate.
  • Add a squeeze of lemon to spike the hot water every once in a while. The lemon acts like soap to scrub the tissue and the hot water becomes the cleansing rinse.

TIP 9: IMPROVE ELIMINATION

One of the most common reasons for weight gain is sluggish elimination. In a previous newsletter, I told the story about a patient who took 2 Triphala capsules after each meal for 2 years and lost 50 pounds.* Triphala is an intestinal cleanser and toner that flushes toxins and excess mucus off the gut wall. This helps assimilate nutrients properly and supports healthy weight while countering the weight-gaining effects of a high fat diet. (11) I also recommend that you increase fiber in your diet by eating more vegetables, fruits and whole grains. You can add 1 tablespoon of ground flax or chia seeds to each meal as a great way to fiber up. These seeds are also loaded with good omega-3 fatty acids which are needed to support weight loss and a stable nervous system.

TIP 10: BEETSweight loss tips Fresh grated beetroot salad image

Try eating one fresh beet a day for the next 3 months to help thin the bile and flush the liver and gallbladder. Beets are best grated raw with lemon juice, but also have benefits when eaten cooked. When the bile flows, the digestive system can break down fat and neutralize digestive acids and the liver can remove toxic fat soluble chemicals. Optimal bile flow may be the most important piece of the digestive puzzle when it comes to weight loss – so eat your beets!

Finally, I would be misleading you to not mention the 2 most powerful tools to reset fat burning. First is exercise. I am a big fan of nasal breathing exercises, and I encourage you to learn more about it and start moving your body every day. Second, eat 3 meals a day, and try to make lunch your biggest and relaxed meal of the day. Having longer periods of time between meals allows the body the time to get into fat burning mode.   I hope I've illustrated successfully why burning fat is more than a weight-loss technique. So don't miss nature's window of opportunity (spring) for teaching your body this amazing skill.

*Note: The results showed in this article are not typical or expected for short- to medium-term use of triphala. While supplementing with triphala can help support healthy weight loss, the only tried and true method of losing substantial amounts of weight is changing one's diet and exercise in accordance with the supervision of a certified health professional. Triphala is best for sluggish elimination, and is not indicated for those with looser stools.


~A.

Herps

https://dgxw3tuy059g0.cloudfront.net/w0/item/5/EraseHerpes.pdf

Before European Christians Forced Gender Roles, Native Americans Acknowledged 5 Genders

Before European Christians Forced Gender Roles, Native Americans Acknowledged 5 Genders

Before European Christians Forced Gender Roles, Native Americans Acknowledged 5 Genders

It wasn't until Europeans took over North America that natives adopted the ideas of gender roles. For Native Americans, there was no set of rules that men and women had to abide by in order to be considered a "normal" member of their tribe.

In fact, people who had both female and male characteristics were viewed as gifted by nature, and therefore, able to see both sides of everything. According to Indian Country Today, all native communities acknowledged the following gender roles: "Female, male, Two Spirit female, Two Spirit male and Transgendered."

"Each tribe has their own specific term, but there was a need for a universal term that the general population could understand. The Navajo refer to Two Spirits as Nádleehí (one who is transformed), among the Lakota is Winkté (indicative of a male who has a compulsion to behave as a female), Niizh Manidoowag (two spirit) in Ojibwe, Hemaneh (half man, half woman) in Cheyenne, to name a few. As the purpose of "Two Spirit" is to be used as a universal term in the English language, it is not always translatable with the same meaning in Native languages. For example, in the Iroquois Cherokee language, there is no way to translate the term, but the Cherokee do have gender variance terms for 'women who feel like men' and vice versa."

The "Two Spirit" culture of Native Americans was one of the first things that Europeans worked to destroy and cover up. According to people like American artist George Catlin, the Two Spirit tradition had to be eradicated before it could go into history books. Catlin said the tradition:

"..Must be extinguished before it can be more fully recorded."

However, it wasn't only white Europeans that tried to hide any trace of native gender bending. According to Indian Country Today, "Spanish Catholic monks destroyed most of the Aztec codices to eradicate traditional Native beliefs and history, including those that told of the Two Spirit tradition." Throughout these efforts by Christians, Native Americans were forced to dress and act according to newly designated gender roles.

One of the most celebrated Two Spirits in recorded history was a Lakota warrior aptly named Finds Them And Kills Them. Osh-Tisch was born a male and married a female, but adorned himself in women's clothing and lived daily life as a female. On June 17 1876, Finds Them And Kills Them gained his reputation when he rescued a fellow tribesman during the Battle of Rosebud Creek. An act of fearless bravery. Below is a picture of Osh-Tisch and his wife.

Osh-Tisch (Left) and his wife (Right)

In Native American cultures, people were valued for their contributions to the tribe, rather than for masculinity or femininity. Parents did not assign gender roles to children either, and even children's clothing tended to be gender neutral. There were no ideas or ideals about how a person should love; it was simply a natural act that occurred without judgement or hesitation.

Without a negative stigma attached to being a Two Spirit, there were no inner-tribal incidents of retaliation or violence toward the chosen people simply due to the fact that individuals identified as the opposite or both genders.

"The Two Spirit people in pre-contact Native America were highly revered and families that included them were considered lucky. Indians believed that a person who was able to see the world through the eyes of both genders at the same time was a gift from The Creator."

Religious influences soon brought serious prejudice against "gender diversity," and so this forced once openly alternative or androgynous people to one of two choices. They could either live in hiding, and in fear of being found out, or they could end their lives. Many of whom did just that.

Source: www.bipartisanreport.com

Comments

576 comments


Sent from my iPad